Wednesday, November 27, 2013

How to add Youtube Channel to Google Analytics


  In this post, I'm going to share how to add youtube channel to  Google Analytics (GA).

Steps


1. Login to your GA account  . If this is the first time you are using Google Analytics, Please go here for my guide on adding it to your website.


2.Click Admin>Property>Create new Property

Create new property


3. Fill in the form and click 'Get Tracking ID' . Make sure your URL link success validate.

Get Tracking ID


4. Go to your youtube page click 'Video Manager > Channel settings > Advanced'

 
Channel settings

5. Fill in  Google Analytics tracking code in your Youtube channel panel .


Adding GA tracking to Youtube channel


That's it . You are good to go. Check your GA account after a couple of days to view your youtube subscriber channel details.


Tuesday, November 26, 2013

How to submit your website to international search engine

  Having your website being found in the world wide web is crucial for those who use internet as advertising medium in their business . Normal internet user will use search engine to do their online searching and shopping .The idea of internet and business is that it break the natural demographic constraint as we have before .

   Search engine have their own method to find new sites .This method operates in the order of web crawling,indexing and searching. In this post, I  share how you can submit your website url to international search engine.

  I have trace few search engines below on  where you can submit your website url. You can submit your website by clicking below link and fill in your website url in the box .Don't forget to click submit. :-)

Baidu

admcity

sunwukong

yandex

Blekko

For Blekko guideline, please visit here

  This will make the search engine notice the site and will notify it's crawler  to find your page. Once you have submit your website,It is a good practice that you incorporate the function of translating your website to different language .One way you can do this is by integrating using Google translate button.

Let me know how it goes, that's it for now. Have a good day.

Read Previous :How to check NEW website on Google Search Engine
Read Next :How to change Blogger/Blogspot URL to custom domain URL

Friday, November 22, 2013

How to create simple interactive folder directory bash script


    When I started using Linux, I always have the problem of navigating into my working folder using the terminal.The case sensitive nature of Linux make it more frustrating and often time get me demotivate and lost in my own system!!.I still remember it took me 3 minute to find the right folder and  just type "cd " and "ls"  along the way . I don't have strong understanding on Linux architecture and how file was arrange back then.

   In this post, I'm going to share  a simple script that we can run directly from the terminal to our respective working folder. This is a simple script that use  if,else,elif function .

Below is the breakdown of this script and how to use it .

1 . The script start off like how a normal bash file look like.Since this is an easy script Next I'm declaring the variable that going to be use in the script. It is better to write all at once for the directory for future maintenance.

#!/bin/bash
#Title : Lazy bum directory link
#Author : shark Attack
#REV:1.0

fold_prog='/home/shark_attack/Programming'
fold_proj='/home/shark_attack/Videos/PROJECT'
fold_mus='/home/shark_attack/Music'
fold_doc='/home/shark_attack/Documents'
fold_hack='/home/shark_attack/hack

2.This part of the script will print  on terminal requesting input from user

echo "Please type folder selection that you want to go"
echo  "1.programming"
echo  "2.project"
echo  "3.music"
echo  "4.documents"
echo  "5.hack"

3. input from the user wil be save in variable call "gugu"

read gugu

4.I used "gugu" as a loop control in this script .Basic idea of this script is when the word type in the terminal is similar with the selection above, the system will navigate it to respective folder.system will then list or open a graphical user interface depending on what user want to do .

if  [ "$gugu" == "project" ]; then
    cd "$fold_proj"     #this will change the current folder directory to desired location
        ls -a                    #listing your directory
    #nautilus "$PWD" 
   
   
elif [ "$gugu" == "programming" ]; then
    cd "$fold_prog"
        ls
       # nautilus "$PWD"
   

elif [ "$gugu" == "documents" ]; then
    cd "$fold_doc"
        ls
        nautilus "$PWD"       #nautilus will open a GUI from your terminal
   
elif [ "$gugu" == "music" ]; then
    cd "$fold_mus"
        ls
      

elif [ "$gugu" == "hack" ]; then
    cd "$fold_hack"
        ls


5. exit loop
else                    \
    echo "folder is not in selection.please try run the command again .."
fi


6. save the script in the location  that was include in your system path. you can type 'echo $PATH' on your terminal . Please refer to my previous post on this .

7. Open the terminal and change the file type

shark_attack@Positive-Space:~$ chmod 754 /home/shark_attack/Programming/bash/desktop


8. Run the command. You can run the command straight from your terminal. Note that there is a different when running as "filename" or ". filename" with and without  . (dot) . . (dot)  is a longer version of "source"

  When a script is run using "source" it runs within the existing shell, any variables created or modified by the script will remain available after the script completes. In contrast if the script is run just as "source.sh" , then a separate subshell (with a completely separate set of variables) would be spawned to run the script.please refer here for more details

9. Run the command from terminal and adjust the script to  what is suitable for your usage
shark_attack@Positive-Space:~$ . desktop

or

shark_attack@Positive-Space:~$ source desktop 

That's it for now.Please find the script here for download and subscribe my page and youtube channel for more tips.


Cara Membatasi Akses PhpMyAdmin Di Linux Berdasarkan IP Address

Hai! Wah, sudah cukup lama juga saya tidak memposting artikel di blog Tutorial Linux Ubuntu Berbahasa Indonesia ini ya. Seperti biasalah, karena keterbatasan waktu dan banyaknya aktifitas saya :D
Saya menulis di blog ini ketika memiliki waktu luang, dan mungkin sekarang adalah waktu yang tepat untuk posting artikel baru. Tidak tau kenapa juga, pembahasan di artikel ini masih berhubungan dengan keamanan di server database. Sebelumnya saya juga menjelaskan topik yang sama di artikel ini :
Mungkin sebenarnya dari semua yang saya jelaskan di artikel-artikel tersebut tidak harus anda pakai semua meskipun saya setuju dengan pernyataan "semakin aman semakin baik, masa bodoh dengan kenyamanan". Di artikel ini saya ingin memberikan informasi tentang pengamanan server database atau server PhpMyAdmin dengan cara membatasi akses PhpMyAdmin berdasarkan IP Address.

Saya sudah menjelaskan cukup panjang lebar dipembahasan sebelumnya bahwa sangat riskan sekali membiarkan PhpMyAdmin terbuka untuk publik, meskipun tidak dipublikasikan tapi tetap saja opened for everyone :)

Akhirnya saya menemukan lagi cara yang menarik, yaitu membatasi akses phpmyadmin berdasarkan IP Address, dengan metode ini phpmyadmin tetap tertutup, dan hanya dibuka untuk orang-orang tertentu.

Hal pertama yang harus anda lakukan adalah membuat IP Address client anda static (kalau DB Admin berada di jaringan lokal), lakukan pengaturan ini di router DHCP anda. Jika anda memiliki relasi kerja diperusahaan lain anda akan memakai IP Public router WAN untuk identitas mereka.

Selanjutnya buka file "/etc/phpmyadmin/apache.conf", dan perhatikan pengaturan yang saya buat :

Alias /phpmyadmin /usr/share/phpmyadmin

<Directory /usr/share/phpmyadmin>
        Options FollowSymLinks
        DirectoryIndex index.php

        <IfModule mod_php5.c>
                AddType application/x-httpd-php .php

                php_flag magic_quotes_gpc Off
                php_flag track_vars On
                php_flag register_globals Off
                php_admin_flag allow_url_fopen Off
                php_value include_path .
                php_admin_value upload_tmp_dir /var/lib/phpmyadmin/tmp
                php_admin_value open_basedir /usr/share/phpmyadmin/:/etc/phpmyadmin/:/var/lib/phpmyadmin/
        </IfModule>
#rule berawal dari sini
deny from all
allow from 10.1.1.1 10.1.1.2 10.1.1.10 10.0.64.1
#rule berakhir sampai sini
</Directory>

Statement "deny from all" sudah jelas sekali akan menolak semua transaksi dari sumber manapun, lalu statement "alow from..." akan mengijinkan beberapa IP address untuk dapat mengaksesnya. Dan lihat daftar IP Address yang saya ijinkan untuk mengakses PhpMyAdmin. Pemisah mereka hanya spasi saja, tidak perlu koma atau apapun. Jika yang di allow adalah network tertentu cukup tambahkan network mereka seperti misalnya 10.1.1.0/25.

Mudah sekali ternyata kan! :)
Sekarang PhpMyAdmin saya hanya dapat diakses dari komputer-komputer yang memiliki IP address diatas.

Metode seperti apa yang akan anda pakai untuk mengamankan server database phpmyadmin? Jelas itu menjadi keputusan anda, saya sudah memberikan beberapa metode yang cukup untuk menjadi bahan pertimbangan anda.

Selamat mencoba,
Salam penguin! :)


Wednesday, November 20, 2013

How to install Kali Linux Tools on Ubuntu 12.04

  
  Kali Linux is a Linux distro that are use mainly for advanced penetration testing .Kali Linux comprise of at least 300 testing tools . For complete tools list, you can refer here . To get more information about Kali, you can visit their website.

    In this post, I'm going to show how we can use Kali Tools in Ubuntu 12.04. Currently I'm running on kernel 3.8.0-33

Steps

1. Open Ubuntu Software center  >edit>software sources

Software source


2.Click  on other software>add

Adding software link on repositories

Add below  package link  in your Ubuntu software repository.

ppa:wagungs/kali-linux
ppa:wagungs/kali-linux1
ppa:wagungs/kali-linux2 

For complete details on this package,  please check here. 

3.Make sure the package is include in your software repositories .

Ubuntu software repositories


4. Update your system repositories.

shark_attack@Positive-Space:~$ sudo apt-get update

5.Search for Kali Tools in Ubuntu software centre and install any program that you wish.If you can't find any program, close Ubuntu software centre , reopen it back and search again. It should work.


Note: I haven't test all the Kali tools program in the repositories as yet . Some of the program might have a compatibility issue with the kernel . If you find any issue with the tools, please comment in the box below

Saturday, November 16, 2013

How to install Aircrack-ng 1.2 beta 1 on Ubuntu 12.04


          Aircrack     is a program that can be use for   packet sniffing, WEP and WPA/WPA2-PSK cracker and analysis tool for 802.11 wireless LANs.This program is a must if you want to test your network wireless security  or your neighbourhood wireless connection ;-) .

   For Aircrack to work properly, you must have the right chipset and driver . You can check  on Aircrack  compatibility  page. The card must support the "monitor mode" and "packet injection" function for 802.11 wireless packets. More on this on upcoming post.

   In this post I'm going to share how we can install Aircrack 1.2 beta1 version on Ubuntu 12.04 . For complete info on this release, you can check it here .It is pretty straight forward  and easy to install .Below are steps that I took to install the program.

Steps


1.Install build-essential package  (you can skip this steps if already have the package)
shark_attack@Positive-Space:~$ sudo apt-get install build-essential

2.Install additional libraries (this library must be include in for aircrack to work)
shark_attack@Positive-Space:~$ sudo apt-get install libssl-dev

3.Download Aircrack 1.2 beta1 version.
shark_attack@Positive-Space:~$  wget http://download.aircrack-ng.org/aircrack-ng-1.2-beta1.tar.gz tar -zxvf aircrack-ng-1.2-beta1.tar.gz

4.Extract the file  (you can also use GUI to extract this folder).
shark_attack@Positive-Space:~$ tar -zxvf aircrack-ng-1.2-beta1.tar.gz

5.Go to the folder.
shark_attack@Positive-Space:~$  cd aircrack-ng-1.2-beta1

6.Use "make" command to compile your source code and creates an executable file for you to install
shark_attack@Positive-Space:~/aircrack-ng-1.2-beta1$ make

7. install the program using "make install"command
shark_attack@Positive-Space:~/aircrack-ng-1.2-beta1$ sudo make install

8. Next ,try to test it. Just remember you must be in root or su to do this.
shark_attack@Positive-Space:~/aircrack-ng-1.2-beta1$ sudo airmon-ng


    In this release, we don't need to change the common.mak file  "werror"  line .We are  required to do so when we install  Aircrack  1.1  .By default the file has been updated.Below is snapshot of my default common.mak file.

Snapshot of common.mak


   I have tried to do some wireless testing using this release and so far the program done it's job .Some people might encounter some bugs along the road on this beta release but what the heck,just give it a go. There are a lot of kind people out there want to give you a helping hand  :-) 


Thursday, November 14, 2013

How to check your Wireless Card supported interface mode


  In this post, I'm going to share how we can use "iw"  package to check our wireless supported interface mode. To be fair," iw" command  can do a whole lot more than checking wireless supported interface. "iw" package is a program that we can use to show and manipulate our wireless connection. Previous package that have similar function and pre installed with Ubuntu 12.04 is "iwconfig".

    "iw" command line is much more easier to use as compared with "iwconfig".I will share in future post on the detail how we can use "iw" command line to scan,connect and changing the interface of our wireless connection.

  Run below command on your terminal

shark_attack@Positive-Space:~$ sudo apt-get install iw

shark_attack@Positive-Space:~$ sudo iw list

Below is two return example of  my wireless card.

Aztech -WL230USB


TP Link-TL WN722N


   For those who are looking the web searching for supported network card interface compatible to use with aircrack / kismet and come across to this blog,
you need to know the  type of chipset that is used and check with respective website for compatibility issue. Sometimes, even if the card is supported to work in monitor mode but the driver can't work properly with the program.Some patching and testing is needed . It is always a good thing to read  forum to get more information.

To check your  chipset model and driver type on terminal

Chipset model

shark_attack@Positive-Space:~$ sudo iw list

Checking wireless card chipset

  I'm using Atheros chipset model AR9271 .


Chipset driver

shark_attack@Positive-Space:~$sudo ls /sys/class/net/wlan0/device/driver/module/drivers
Checking chipset driver
ath9k_htc driver come with Ubuntu 12.04 kernel 3.8.0-30-generic .


Saturday, November 9, 2013

How to check your NEW website on Google search

  If you  have a new website, Having traffic is necessary to attract people to visit your page.For this reason, search engine always play an important role  . In this post, I'm going to share how you can check your new website on Google .

  If you can't find your website on Google search even If you have update  few time,don't be panic. It take time for new site to be include in the search engine.Give Google few weeks  for Google crawler to find your site . You can try different method and type in the Google search "site : (your website URL)"  .Below is an example how I look for my site on Google Search.


                                      Example how to search in Google
                                             
  To expedite Google Crawler to find your site, You can have it register on Google page.Please visit  here  to do so.

  After few weeks and you still can't find your page on Google,there might be few reason why this night happen.One of the most common reason is  due to  robot.txt file .Robot.txt file can determine whether you allow Google Crawler to find your page or not.You can do much more details function and specific way on how Google want to find your page by customizing your robot.txt file .You can read it here for more info.Before editing your  robot.txt file, make sure you know what you doing. There is no harm in testing you always learn something new :-)


Friday, November 8, 2013

Hal-Hal Yang Harus Dilakukan Oleh Seorang System Administrator

Seorang system administrator mempunyai tanggung jawab yang cukup besar didalam sebuah perusahaan, semua data yang berkaitan dengan perusahaan tersebut menjadi tanggung jawab yang harus benar-benar dijaga oleh seorang system administrator. Dalam pengelolaan data-data tersebut mereka harus mengamankannya dari dari kerusakan file, kehilangan file, atau kerusakan yang disebabkan oleh pihak luar. Tidak ada orang yang langsung menguasai sesuatu secara langsung dan instant, semuanya akan menjalani proses-proses yang cukup panjang, jadi jika anda adalah seorang system administrator yang baru saja menginjakkan kaki dibidang infrastruktur sistem, jangan pernah berkecil hati atau minder karena anda seorang pemula. Percayalah, waktu akan membawa anda pada pengalaman yang luar biasa jika anda bisa memanfaatkannya. Dengan dibuatnya tulisan ini, mungkin akan menambahkan wawasan anda mengenai tugas-tugas penting yang harus dilakukan oleh seorang system administrator.

[ Monitoring Performance Server ]
Jangan perdulikan anda berada di instansi yang kecil, sedang, atau besar. Hal ini tetap harus diperhatikan, jangan sampai tidak! Karena jika performance server kita tidak stabil, maka dalam hitungan detik saja anda dapat memberikan kerugian pada perusahaan. Dan ketika user meng-complain kita, rasanya tidak enak didengar. Jadi monitoring performance server itu harus selalu pantau, Malah kalau bisa saya sarankan anda selalu mobile. Buatlah tool kecil yang bisa mengintegrasikan server-server dengan gadget anda. Mengingat perkembangan gadget yang semakin canggih belakangan ini, rasanya hal itu sudah sangat memungkinkan, tidak perlu yang bagus-bagus, buat saja yang sederhana. Asalkan SNMP server dapat berfungsi baik ketika salah satu server mengalami penurunan performance atau down. Jika anda bukan seorang developer dan malas seperti saya, anda juga bisa menggunakan monitoring tools yang sudah ada seperti misalnya Zenoss, openNMS, The Dude, Observium, atau yang lainnya. Dan jangan lupa untuk menginstall service sendmail didalam server monitoring anda, ini cukup membantu ketika server anda mengalami penurunan performance atau bahkan down, maka fitur-fitur pada tools tadi akan mengirimkan email kepada anda secara langsung. Biasanya error alert pada server ada tingkatannya, dari warning sampai critical warning. Jangan sampai anda mendapatkan notifikasi critical warning karena berarti kondisinya benar-benar gawat. Dengan tools tadi anda bukan hanya bisa memonitoring server tetapi juga perangkat-perangkat jaringan yang aktif seperti switch, router, dan access point. Tapi itu juga jika memang perangkat-perangkat tersebut mempunyai fitur SNMP.

[ Backup Data ]
Jangan besar kepala hanya karena anda handal mengendalikan performance server, baik itu dari segi pengaturan performance ataupun pengelolaan data, backup data tetap harus ada! Kita bahkan tidak tau apa yang akan terjadi dalam satu detik kemudian, jadi lebih baik mencegah daripada mengatasi. Dalam melakukan backup data sebaiknya dilakukan dalam beberapa metode sekaligus. Buatlah jadwal backup otomatis dengan tujuan yang berbeda. Saya pribadi membackup data-data server setiap hari, dari backup-backup harian tadi saya akan mem-burning setiap minggu. Boros memang, tapi rasanya worth it lah. Selain itu, buatlah sebuah server backup DRC (Disaster Recovery Center). Seperti yang tadi saya katakan, kita tidak tau apa yang akan terjadi satu detik kemudian, bencana alam atau kebakaran mungkin saja terjadi dan merobohkan gedung kantor anda. Dan saat itu terjadi, kita memiliki backup ditempat lain. Ya! DRC tidak boleh berada didalam gedung yang sama dengan gedung kantor kita, dikhawatirkan karena jika terjadi kehancuran pada gedung kantor utama dan mengakibatkan server kita rusak berat, maka kita mempunyai backup data secara utuh ditempat lain.

[ Keamanan. Jangan Membuka Port Yang Tidak Dipakai Oleh Aplikasi ]
Bicara mengenai kemanan tentunya kita tau akan bermain dengan firewall. Cara memasang firewall di server itu ada beberapa metode, anda bisa memakai metode drop all allow some atau allow all drop some. Sebelumnya saya pernah menjelaskan mengenai firewall secara detail di artikel ini, silahkan disimak jika anda belum pernah membacanya. Menurut saya pribadi membuka terlalu banyak port server itu adalah riskan. Sangat rentan sekali oleh serangan hacker. Jaringan itu luas, ada banyak watak yang bermacam-macam di setiap user nya. Tentu saja kita tidak menginginkan server-server kita kesurupan orang-orang yang tidak bertanggung jawab. Saya pribadi hanya membuka port-port yang memang dipakai oleh aplikasi, jika tidak untuk apa saya buka? Akses ssh pun saya rubah, saya segan membiarkan port ssh menggunakan port default. Jika server anda memakai system operasi linux, cara mengganti port ssh di linux juga sudah saya jelaskan di artikel sebelumnya. Dan juga, saya tidak membiarkan siapapun masuk selain orang-orang dengan IP address tertentu yang sudah saya patenkan dengan mac address nya di router.

Saya rasa masih banyak hal-hal yang harus dilakukan oleh seorang system administrator, tulisan kecil ini hanya gambaran secara global saja. Mungkin dilain kesempatan saya akan jelaskan lebih mendetail lagi. Semoga dapat menambah wawasan kepada anda.

Semoga bermanfaat,
Salam penguin! :)


Monday, November 4, 2013

How to extend home wifi signal using Coke Can for free (with realtime data log)


    I'm living in a two storey house and I always have problem with my wireless connection whenever I'm working upstairs.There is a way we can enhance our home wireless router range with some small can coke hack. In this post I'll be sharing how to do this trick.

   I will use the exact same location for my laptop for this purpose and will share the wireless reading from my machine. In Linux, we can see our wireless signal strength by using "watch" command. "watch" execute program periodically and will give output on the screen.By default it will give 2 sec return time interval.  we can change this using command below .


watch --internal 0.5 cat /proc/net/wireless         #returning 0.5 sec time interval

   My home is using Netgear Wifi router and with this project,I'm using Aztech WL230USB Wireless card


Below are the things that you need to do this trick,


                                          Figure 1: Item needed for this trick

1. A can
2. Scissor
3 .knife
4.Glove

Skill level : primary school :-)

Steps

1. Clean the can
2. Cut the bottom of the can
                                            Figure 2 : Coke can without bottom

3. Cut 3/4  vertically from sideways on top of the can (make sure the can tio is facing upward)

4. Use scissor to cut the can. Stretch the can open

                                                Figure 3 : Stretch the can


5. plug out the tip of the can
6. Install it to your modem.
                                         Figure 4 : Install the can to your router


7. Check your machine and  re direct the coke can to face  the location that you want the range to be at . The final position of the router in my house  is as below.

                                      Figure 5 : My final router setting
 

This is my machine  final reading  with current wireless router  setting.


                                   Figure 6: My   Wireless signal quality reading


we can also use "iwconfig"  command to get our machine wireless reading.

watch  --interval 0.5 iwconfig wlan0


Figure 7 :My Wireless signal quality reading 


Read Previous:How to make Torrent or any file to work in Firefox
Read Next : How to check your Wireless card supported interface mode

Saturday, November 2, 2013

Cara Mengamankan PhpMyAdmin Dengan SSL Mode HTTPS Di Linux Ubuntu

Bonjour! Server database adalah sebuah area yang sangat sensitif, dimana tidak bisa sembarang orang dapat mengaksesnya atau mengambil data didalamnya, apalagi jika mempunyai niat yang tidak baik. Semua itu harus dijauhkan dari server database karena akibatnya akan sangat fatal. Ada banyak metode yang bisa dilakukan oleh seorang system administrator.

Seperti yang kita ketahui bahwa PhpMyAdmin adalah salah satu media konsol database yang memudahkan pekerjaan kita daripada harus mengakses database menggunakan CLI. Namun terkadang resiko kesalahan bisa lebih besar ketika kita mengotak-atik database dengan konsol CLI daripada ketika kita mengaksesnya dengan PhpMyAdmin. Lalu pertanyaannya adalah, apakah kita yakin jika PhpMyAdmin kita buka maka server kita aman? Tentu tidak! Sebelumnya saya pernah membahas mengenai beberapa metode pengamanan PhpMyAdmin di linux. Sebenarnya dengan cara yang saya tulis di artikel tersebut sudah cukup aman, namun jika boleh saya jujur itu masih kurang aman. Karena didalam artikel saya tersebut PhpMyAdmin masih diakses dengan HTTP Mode. Itu artinya Sniffing masih mempunyai kemungkinan untuk dilakukan bukan? Tentu kita tidak mau server database kita di obrak-abrik oleh para hacker. Dengan ditulisnya artikel ini saya akan memberikan tutorial tentang bagaimana caranya mengamankan PhpMyAdmin dengan SSL Mode HTTPS di Linux. Metode ini saya praktekan dengan VM Ubuntu Server, bagi anda yang memakai distro linux lainnya sepertinya tidak akan berbeda terlalu jauh. Jika anda belum menginstall PhpMyAdmin di server anda, silahkan install terlebih dahulu, jika anda belum mengetahui cara install PhpMyAdmin di Linux anda bisa mengikuti langkah-langkahnya di artikel saya sebelumnya.

Baiklah kita mulai, saya memberikan IP Address 192.168.1.1 pada VM saya. Langkah pertama yang akan kita lakukan adalah kita memberikan autentikasi sebelum mengakses halaman login PhpMyAdmin. Hal ini sangat saya rekomendasikan untuk anda lakukan demi mengamankan PhpMyAdmin anda. Cara memberikan autentikasi pada PhpMyAdmin adalah :

Buka file /etc/phpmyadmin/apache2.conf. Lalu cari text "DirectoryIndex index.php". Lalu tambahkan line dibawahnya "AllowOverride All".
<Directory /usr/share/phpmyadmin>
Options FollowSymLinks
DirectoryIndex index.php
AllowOverride All
. . .

membuat file .htaccess pada folder /usr/share/phpmyadmin/. Masukkan script dibawah ini :
AuthType Basic
AuthName "Restricted Files"
AuthUserFile /etc/phpmyadmin/.htpasswd
Require valid-user

Script diatas akan mengarahkan user pada autentikasi sebelum mengakses halaman login PhpMyAdmin. Username dan password yang digunakan untuk autentikasi tersebut berbeda dengan username dan password yang dipakai untuk mengakses MySQL via CLI atau via PhpMyAdmin. File username dan password untuk autentikasi ini akan disimpan di folder /etc/phpmyadmin/.htpasswd. Selanjutnya yang akan kita lakukan adalah membuat username dan password untuk autentikasi. Ketikkan perintah ini di server atau VM anda :
sudo htpasswd -c /etc/phpmyadmin/.htpasswd user_name
Setelah anda menekan enter untuk perintah tersebut, anda akan disuruh membuat password untuk user tersebut. Perintah ini akan membuat sebuah user untuk autentikasi sebelum mengakses halaman login PhpMyAdmin dan file tersebut akan disimpan pada file /etc/phpmyadmin/.htpasswd. Untuk mengujinya silahkan restart service apache anda.
sudo service apache2 restart
Maka seharusnya anda mendapatkan tampilan seperti ini :
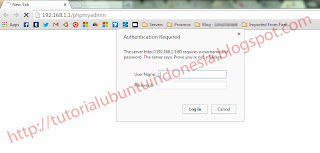
Autentikasi sebelum mengakses login page PhpMyAdmin

Selanjutnya adalah kita akan memaksa PhpMyAdmin diakses melalui HTTPS, bukan HTTP. Ini bertujuan supaya setiap transaksi data antara kita dan server tersebut di enkripsi. Jadi tidak ada kesempatan bagi para hacker untuk melakukan sniffing. Cara mengkonfigurasi HTTPS SSL Mode di Linux sebenarnya sudah saya bahas diartikel sebelumnya. Tapi daripada ribet, saya akan menuliskan ulang diartikel ini. Cara konfigurasi PhpMyAdmin dengan HTTPS SSL Mode, pertama, lakukan dua perintah dibawah ini pada server anda :
sudo a2enmod ssl
sudo service apache2 restart

Lalu buatlah direktori untuk menyimpan file certificate SSL, dan buatlah cert dan key dengan perintah ini :
sudo mkdir /etc/apache2/ssl
sudo openssl req -x509 -nodes -days 365 -newkey rsa:2048 -keyout /etc/apache2/ssl/apache.key -out /etc/apache2/ssl/apache.crt

Perintah diatas akan membuat file certificate yang berlaku untuk 365 hari atau 1 tahun dengan enkripsi 2048 bit. Lalu kedua file tersebut akan disimpan didalam folder /etc/apache2/ssl. Setelah anda menekan enter untuk perintah tersebut, anda harus mengisi pertanyaan-pertanyaan yang tampil seperti dibawah, isilah dengan benar.
You are about to be asked to enter information that will be incorporated
into your certificate request.
What you are about to enter is what is called a Distinguished Name or a DN.
There are quite a few fields but you can leave some blank
For some fields there will be a default value,
If you enter '.', the field will be left blank.
-----
Country Name (2 letter code) [AU]:ID
State or Province Name (full name) [Some-State]:West Java
Locality Name (eg, city) []:Bandung
Organization Name (eg, company) [Internet Widgits Pty Ltd]:Apocalypsix Inc
Organizational Unit Name (eg, section) []:IT Dept
Common Name (e.g. server FQDN or YOUR name) []:apocalypsix.com
Email Address []:webmaster@apocalypsix.com

Setelah membuat file certificate dan key kita tambahkan NameVirtualHost :443 didalam file /etc/apache2/ports.conf. Lalu selanjutnya adalah mengkonfigurasi file site default-ssl di folder /etc/apache2/default-ssl. Masukkan lokasi apache.key dan apache.cert yang kita buat sebelumnya. Cari dan rubah line tersebut sesuai path masing-masing.
SSLEngine on
SSLCertificateFile /etc/apache2/ssl/apache.crt
SSLCertificateKeyFile /etc/apache2/ssl/apache.key

Tutup dan save. Lalu selanjutnya adalah memaksa PhpMyAdmin diakses melalui HTTPS. Masukkan script dibawah ini kedalam file /etc/phpmyadmin/config.inc.php. Simpan script ini di line paling bawah.
$cfg['ForceSSL'] = true;

Simpan dan Tutup file. Lalu aktifkan site default-ssl
sudo a2ensite default-ssl
sudo service apache2 restart

Untuk melihat hasilnya anda bisa coba dengan memanggil phpmyadmin.
192.168.1.1/phpmyadmin

Pertama anda akan melihat tampilan seperti dibawah ini. Masukkan username dan password yang kita buat tadi.
Autentikasi sebelum login page PhpMyAdmin

Lalu setelah anda login akan tampil halaman seperti ini :
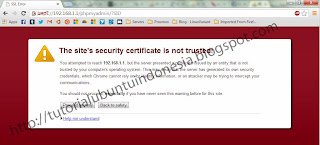
Security warning SSL
Dan akhirnya anda akan melihat login page PhpMyAdmin :
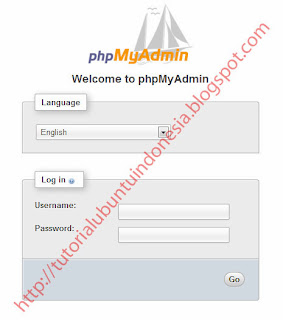
Login Page PhpMyAdmin
Login dengan username dan password mysql anda.
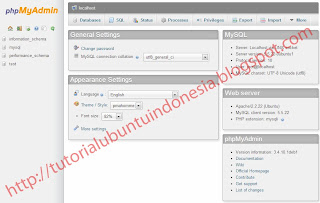
PhpMyAdmin

Dan sekarang server database anda sudah lebih aman dari sebelumnya. Cara mengamankan PhpMyAdmin dengan SSL Mode HTTPS di linux tidak sulit bukan. Semoga artikel ini membantu anda.

Semoga bermanfaat,
Salam penguin! :)