Friday, January 31, 2014

How to use Vox for basic system function,remote VNC Raspberry Pi login and others ( Vox part 2 script)


 This post show How to use Vox for controlling system basic function using voice recognition .It is a continuity from my previous post    .At this moment, The program consist of 3 main script.There will be  a more function added to this program in the future .

Script

1.vox (main script)
2.vrec (recording script. will use more for future development)
3.vsort ( return text integrate with local system script )


Script details

1.Vox script(main script)


1.1.Variable declaration and changing directory working directory to ~/vox-master .

URL="http://www.google.com/speech-api/v1/recognize?lang=en-us&client=chromium&maxresults=10" 


 cd ~/vox-master

If you use different language than english, you need to  change "en-us" in the above script..Check here for language reference. Notice the "&maxresults=10" line . What this line do is, it request for maximum 10 results from Google server.


1.2. Calling the recording program.

./vrec

Currently, the program can only record for 3 seconds  .You can remove this line and just  use          " rec -r 16000 -b 16 voice.flac trim 0 3 " instead .The recorded file will be save as "voice.flac"

1.3 "voice.flac" will then be send over to Google voice search engine and it will feedback a text message to our system . The retrieve result from Google is then pipe into a file call "result" .I use "result" information  to custom  my "vsort"file .

wget -q -U "Ninetailfox" --post-file voice.flac --header "Content-Type: audio/x-flac; rate=16000" -O - "$URL" >result

The detail information of the above command is much more easier to understand with snapshot from Wireshark . Click here to download vox wireshark file .

Vox Wireshark snapshot


1.4 Sorting out the return result and send it over to "vsort" script. After vsort file being execute, The program will wait for 5 second delay before executing .


RETURN="$(cat result | cut -d\" -f12 )"
echo "you said :$RETURN"
./vsort "$RETURN"
sleep 5

2 Vrec script .
At this moment, Vrec only consist of one line .I'll be using this file more in the future development.


3.Vsort script


What this script does is it associate the word that has been retrieve from Google server and use it to execute a command  that is associated with your system. You need to make sure what kind of word is use and what command you want  to execute . You need to edit this file to make it work with your system.


In the existing script ,

case "$1" in
 'ping server') 
 cd /home/shark_attack/Programming/bash
 ./pi -ping 
 ;;

'ping server' is the word I choose and I want it to execute my "./pi" script  in  "/home/shark_attack/Programming/bash" . Click here to check my previous post on my pi script .

I will update more function on vox in the future . At the moment, I'm testing some other stuff and playing around with some code. That's it for now.Please leave comment on the box below .


How to use Voice for basic system control function,Raspberry pi remote VNC server login etc (Vox install and use)


   A few days ago I played around with Google voice search and wonder if  Google has this good program that can detect voice and return their search result, I can use this function to make use on my system . Instead of  writing big chunk program with dictionary stuff to do some basic voice recognition function,I can make use Google server voice recognition service to return the text and execute it on my system. Once I start to work around the script, I realize there is heaps of function I can integrate with this script. This can be a good program by itself.

  In this post , I'm going to share how you can use Google voice recognition to do simple task with your system . The idea behind this program is  using your recorded voice,send it to Google server and it will  translate the voice to text . The translated text will be use as a control structure to run basic command for your system .

What do you need for this project?

1. Internet connection
2. Built in or external mic
3. Any Linux Distro (Bash shell)
5. A little bit of bash scripting knowledge

Steps

1. Download the source code zip file. Extract it on your "home" folder . Please click here

Downloading Vox


2.Run the "setup" file
shark_attack@Positive-Space:~$ cd vox-master
shark_attack@Positive-Space:~/vox-master$ sudo ./setup   
#installing Vox dependencies and run it                

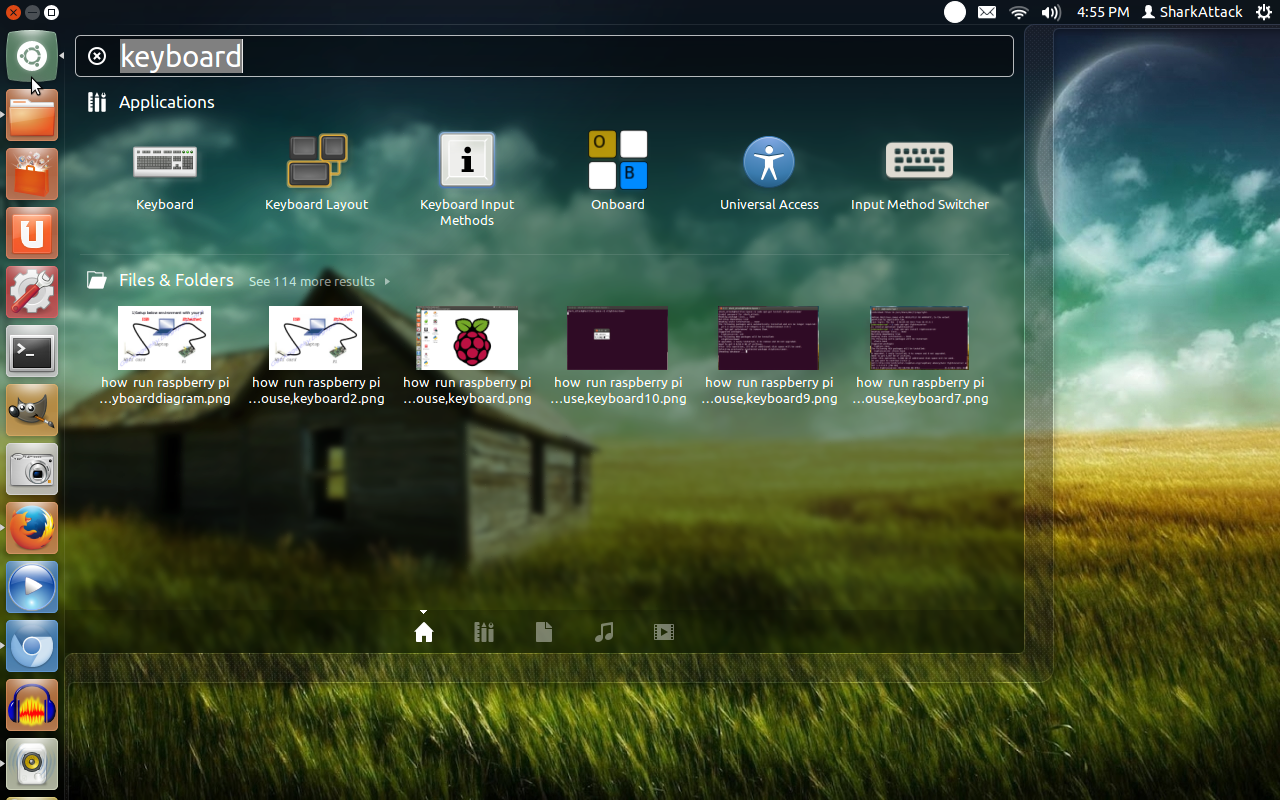
3.Set your keyboard shortcut .Open your keyboard setting . Since I'm running on Ubuntu 12.04 , below is snapshot how to do this. If you are running on different Linux Distro, you can try to look around in your system .

3.1. Search for Keyboard setting
Search for Keyboard setting

3.2 Click "Shortuct>Custom Shortcut" and click the '+' sign . Give it a name .You can use your own name if you want to :)

add new shortcut

3.3 In the command box . add below command in the shortcut box

gnome-terminal -e /usr/local/bin/vox

edit the command part

3.4 Click on the right side and give it a shortcut that you want . In my case, I use "CTRL -M"
 
choose your shortcut

4. Edit "vsort" file to use it with your  system setting.The voice recognition is not 100% accurate because of different dictation between people and how Google server feedback the result to our system.For that reason ,I save 10 utterance  that being detected by Google in the "result" file . You can use the result uttterence word by editing in  the "vsort" file .I will share the detail script drill down information in the next post .Stay tune .

5.Next test and play around with it. You can run it from the terminal or use the shortcut key you  have set .
shark_attack@Positive-Space:~$ vox

The program should work with basic file searching using your own voice.This program is still under testing phase and I will update more function to vox.Anyone interested with this project  or have cool idea what to include in are welcome to contribute.Please visit my Github page.


Read Previous :How to convert video file type with robot voice feedback using bash script on Linux
Read Next :How to use Vox for basic system control,remote VNC Raspberry Pi login and others (Vox part 2)

Sunday, January 19, 2014

How to convert video file type with robot voice feedback using bash script on Linux


  When I record my screen video, I used  desktop recorder software call "RecordMyDesktop" .You can get it by downloading from Ubuntu repositories. The recorder will record in .OGV file type. Video editor like Openshot (version 1.4.3), Kdenlive (version 4.8.5) ,Pitivi and others have problem in editing this  kind of file type.Sometime while using  the video editor to edit  .OGV file, you will get skipping frame,frame not moving or grey screen .

 To resolve this issue, I used "avconv" to convert my video to other file type . "avconv" is  fast and reliable tools  that can be use to grab audio/video source ,convert file and do many other cool stuff. There are certain settings that  I used to make sure the converted video is in good quality when using "avconv" . I will share some tricks on using "avconv" in other post.

   In this post, I will share how you can create a bash script to convert your video file,what the script does is, it will convert the file and will ask  user what name will it give to the new file with robot feedback voice . The script will only convert a single file at a time.To make it run on your machine, you need to save the script inside the folder which is included in your working PATH .Please refer here for more information.

Script drill down
---------------------

1.My Normal script header


#!/bin/bash
#Title : Video converter with robot feedback voice
#Author : N3rv3wr3ck
#Date : 17/1/2014
#Rev : 1.0


2. "Avconv" setting for my video conversion.I convert the file to MP4

avconv -i $1 -s hd1080 -c:v libx264 -crf 23 -c:a aac -strict -2 $1.mp4  # file type that you want to convert to


3. "espeak"is function that I use to convert text to speech.Make sure you put the word in ("") .On terminal it will echo "Please rename your file" .Once you type the file name,it will be store in variable "new"

espeak "Please rename your file"                                       # robot voice for file renaming
echo "Please rename your file " # show on screen
read new # store in variable "new"


4.This part of the script will rename the existing file in the directory. Since i'm using this script for .ogv file converted to  .Mp4 ,the converted file by default will have  naming convention something like "filename.ogv.mp4" . for loop control will look for file with ".ogv.mp4"and will rename the file using the name stored in variable "new" . The new file name will change it's naming convention to  "filename.mp4"

for file in *ogv.mp4;do                                         # The converter file will have ".ogv.mp4" 
file name mv "$file" "$new.mp4"                        # Rename the file using above variable 
done

Test it!!!

Please download the  full script here .


Saturday, January 11, 2014

How to make Google Adsense account work with new blogger custom domain URL


    In this post, I'm going to share how to  make Adsense account work with new blogger custom domain .This post is for Adsense user who are on "Hosted Account " .Adsense "Hosted Account "  is account title you get when you sign in with  host partner. If you register your Adsense account from Blogger/Blogspot, there is a high possibility you are on  "Hosted Account" title.


   In order to get your Adsense to work with your non-host partner  domain, you need to request for a account review.Non-host partner domain is domain that doesn't belong to host partner.This include domain that you registered yourself . This post show what you need to do to submit the application for review. It will take some time for your website to get approved from Google Adsense team, depending on your website traffic , website content and other related details.


Steps


1) Login to your adsense account . Check on top left side whether it show as " Hosted Account" . Make sure you are under "Hosted Account" before continue with this tutorial.


Make sure it is "Hosted Account"


2)From the main panel, go to "Settings > Access and Authorization "


3) Key in your custom domain in the box an click "Submit" for review .


Enter your custom domain

Succced send for review


4)Go to "My ads >URL Channels > New URL channel" and add your URL as your new Channel


Adding New Channel

Add your Channel


5)Claim sites and create new channel

Sites claim


6)Go to  "My Ads" ,add your Ads code into your website


Get your code

Copy Ads code


7) Go to your "Blogger>Layout"  and replace the old Ads code with the new one


Delete old Ads code

Add new code

New Ads code in blogger


   After you update the Ads code, save it and Google Adsense team will review your application.It only took me  one day to get approval for my account. Below is snapshot of my approved account. Notice that the "Hosted Account" sign is remove. Once it is approved, your ads will be publish as normal on your new domain.


Tuesday, January 7, 2014

How to use rsync on local and remote machine in Linux 8 tips and tricks


     "rsync"
is a robust command tool that can be use to copy and synchronize folder either locally or remotely.It offer a large number of  options that we can use to control the behavior on how our machine handle file copying process. "rsync" use  its famous  delta transferring algorithm that make it flexible and extraordinary fast copying tool . For more information, please refer here .

    In this post, I'm going to share how you can use "rsync" command line on your everyday job task. "rsync"  can be  use in either in local mode only or between local and remote machine .If you use in local mode,it will act like an improved copy tools. If you use "rsync" between local and remote machine, It must be note here that "rsync" does not use any kind of secure file transmission .If you run it on unsecure network It is advisable to run in SSH mode  .


Guideline on using "rsync" in this tutorial
Local:
rsync -[OPTIONS] [SOURCE ] [DESTINATION]

Access via Remote ssh :
push : rsync -[OPTIONS] [SOURCE] [USER]@[HOST]:[DESTINATION]

pull : rsync -[OPTIONS] [USER]@[HOST]:[DESTINATION] [SOURCE]


[OPTIONS] that I use in this tutorial

-e                  = specify remote shell to use
-z                  =compress file data during the transfer
-v                  =give information on screen what is transferred and brief summary on whats going on
-a                  =It is a way of saying you want recursion and want to preserve everything form sourcefile
-u , --update  = skip any files which exist on the  destination  and  have  a  modified  time that is newer than the sourcefile
--delete         =delete extraneous files on the destination side (ones that aren’t on the sending side), but only  for  the directories  that  are  being synchronized.


8 Tip and tricks

1. Copy single file in local machine
2. Copy directory in local machine.
3. Synchronizing directory in local machine
4. Synchronizing file between folder without over writting file on the destination
5. Copy file from local machine to remote machine
6. Copy folder from local to remote machine.
7. Copy folder from remote to local machine.(execute on local)
8. Synchronizing from remote to local machine folder (execute on local)

(Note : I've  setup my SSH connection login without using any password .Please click here  to see how do I do it . I will share how you can run the command if you don't configure the SSH . Bare in mind if you don't configure the SSH, you will be prompted with login  password every time you execute rsync command.)


1. Copy single file in local machine

rsync -avz /home/shark_attack/Documents/Technical/linux/emacs.pdf /home/shark_attack/Desktop/backup

2. Copy directory in local machine.

rsync -avz /home/shark_attack/Documents/Technical/linux /home/shark_attack/Desktop/backup

3. Synchronizing directory in local machine

rsync -avz  --delete /home/shark_attack/Documents/Technical/linux /home/shark_attack/Desktop/backup


4. Synchronizing file between folder without over writing file on the destination

rsync -avzu /home/shark_attack/Documents/Technical/linux /home/shark_attack/Desktop/backup

5. Copy file from local machine to remote machine ( "pi" is my username "10.42.0.68" is remote  ip) .
Make sure you have the folder that you want to use as backup folder in the remote machine. You can do this by executing "mkdir" command .I set my backup folder  under "/home/pi/backup" 

rsync -avz /home/shark_attack/Documents/Technical/linux/emacs.pdf pi@10.42.0.68:/home/pi/backup

or

rsync -avz -e ssh /home/shark_attack/Documents/Technical/linux/emacs.pdf pi@10.42.0.68:/home/pi/backup


6. Copy folder from local to remote machine.

rsync -avz /home/shark_attack/Documents/Technical/linux pi@10.42.0.68:/home/pi/backup

or

rsync -avz -e ssh /home/shark_attack/Documents/Technical/linux pi@10.42.0.68:/home/pi/backup


7. Copy folder from remote to local machine.(execute on local)

rsync -avz pi@10.42.0.68 pi@10.42.0.68:/home/pi/backup /home/shark_attack/Desktop

or

rsync -avz -e ssh pi@10.42.0.68:/home/pi/backup /home/shark_attack/Desktop

8. Synchronizing from remote to local machine folder (execute on local)

rsync -avz --delete pi@10.42.0.68 pi@10.42.0.68:/home/pi/backup /home/shark_attack/Desktop

or

rsync -avz --delete -e ssh  pi@10.42.0.68:/home/pi/backup /home/shark_attack/Desktop


Friday, January 3, 2014

How to remote SSH login Raspberry Pi without using password on Ubuntu


   In this post, I'm going to share How to SSH login Remote Server (Raspberry Pi) without using password .

  SSH is a secure cryptographic network protocol that can be use between two connected host for data communication, over an unsecured environment . SSH uses private key and public key in the encryption and decryption process

  Private key is a read only key and only meant for your local host.This key is stored in your local machine.Public key is a key that is stored in the machine that you want to log in to. Public key  is stored in  ".ssh/authorized_keys" remote machine folder. If you have multiple machine that you want to log into ,you need to setup all the machine using the same public key .

 Public key on the remote machine is use to encrypt the message that will transfer over the network while private key on your local machine is use to decrypt the message .As a security measure, SSH program store the private key in protected  pass phrase. If your machine or stolen, you should able to change or disable your old public key. For more info on SSH and public key cryptography, please read here and here

  In this post,I'm using my Raspberry Pi as a remote server . I will not setting the passphrase private and public key in this tutorial. You are free to do so if you want to .

Steps

1. Create public and private keys  on your local host.

shark_attack@Positive-Space:~$ ssh-keygen

2.Copy the public keys from the local host to the remote server ".ssh/authorized_keys "  .

shark_attack@Positive-Space:~$ ssh-copy-id -i ~/.ssh/id_rsa.pub pi@10.42.0.68

In the example above, "pi" is my username and "10.42.0.68" is my Remote server (Raspberry Pi)  IP .

3. Try to login from Local host to Remote host.


Read Previous : How to write VNC Server and VNC client startup Bash script
Read Next : How to convert video file type with robot feedback voice using bash script