In this post, I'm going to share step by step how to install Kali Linux in Ubuntu Virtualbox for penetration testing and hacking.Before we go further , please make sure you have Virtualbox installed in your Ubuntu system.Please check my previous tutorial on how to install Virtualbox in Ubuntu .
Requirement
Kali Linux require
1.A minimum of 10 GB disk space for the Kali Linux install
2.For i386 and amd64 architectures, a minimum of 512MB RAM.
What we will do in this tutorial
1. Download Latest Kali Linux
2. Check Sha1sum (optional)
3. Create Kali Linux Virtual Machine on Virtualbox
4. Configure Kali Linux Virtual Machine additional settings
5. Install Kali Linux on Hard Drive
6. Reboot and login to Kali Linux Virtual Machine
Steps
1.Download kali linux from their website.
1.1) Choose the right software version compatible with your system by checking in the terminal
shark_attack@Positive-Space:~$ file /sbin/init
 |
| Checking System CPU bit |
 |
| Choose the right file to download |
1.2)Choose either to download using torrent or direct.
 |
| Saving Torrent |
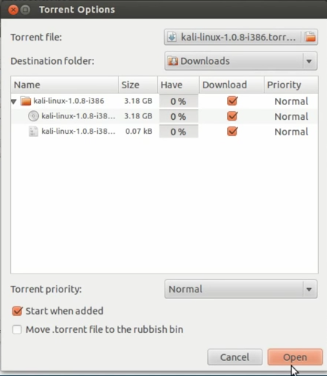 |
| Downloading Torrent |
 |
| Downloading in progress |
2. Check Sha1sum (optional) once the download completed.This step is to make sure the downloaded file is not corrupted
2.1) Open the terminal and navigate to the downloaded file location.
2.2) Run command to check sha1sum and use Sha1sum given in Kali Linux download page. In my case, my Sha1sum is "6edfe99df28747d828ef6de17ded66fed6659a86"
shark_attack@Positive-Space:~/Downloads/kali-linux-1.0.8-i386$ sha1sum kali-linux-1.0.8-i386 | grep 6edfe99df28747d828ef6de17ded66fed6659a8
 |
| Copy the Sha1sum from website |
2.3) Check the file on your system terminal .
 |
| Sha1sum checking |
3. Create Kali Linux Virtual Machine on Virtualbox
3.1) Open Oracle Virtualbox Manager from 'Dash Home'
 |
| Search Ora |
3.2)Click 'New' to add new virtual system
 |
| Adding new Virtual system |
3.3)Give your Virtual machine 'Name ,Type and Version > Next'
 |
| Name,Type,Version |
3.4)Allocate memory size for your virtual system. I'm using 1024MB for my Kali Linux. The RAM amount depends on what you plan to do with your Virtualbox, how many client you want to run concurrently on Ubuntu host and don't forget Ubuntu host also needs RAM to work . Then proceed with 'Next' button .
 |
| RAM size |
3.5) Click 'Create virtual hard drive' > 'Create' . Kali Linux require at least 10 GB of hard drive size.
3.6) Choose VDI to install Kali Linux on your hard drive. For further reading on virtual storage, please visit here.  |
| Choose VDI |
3.7)Choose 'Dynamically allocated' for more flexible storage system. And click 'Next' .For further reading, please visit here.
 |
| Dynamically allocated |
3.7)Choose file location and size. I Choose 20GB for my Kali Linux virtual system . Then click 'Create'
 |
| Adding disk size |
4. Configure Kali Linux Virtual Machine additional settings
4.1) Click 'Settings'
 |
| Settings |
4.2)Go to System on the left hand panel and click 'Processor'
4.3)Tick 'Enable PAE/NX' function . PAE is short form of 'Physical Address Extension'. his setting will enables 32-bit processors to access more than 4 GB of physical memory. If your client is running on 32 bit processor, This is made possible by adding 4 bit to memory addresses. if a system is running on 32 bit x86, it will have 36 bit and can addressed up to 64 GB of RAM.
NX means 'No Execute' . This means your CPU know how to prevent memory safer by prevent programs from executing code in that part.
You can check your processor details in BIOS .
 |
| Enable PAE/NX |
4,4) 'Start' Kali Linux virtual machine .
 |
| Click Start |
5. Install Kali Linux on Hard Drive
5.1)Choose Kali Linux image in location where you download it. Then click 'Start'
 |
| Choose Kali Linux ISO |
 |
| Click Start |
5.2) Choose 'Install'
 |
| Install |
5.3) Choose 'Language'
 |
| Language |
5.4)Choose 'Country'
5.5) Configure the 'Keyboard'
5.6)Configure 'Hostname' . Key in any name you want for your Kali host and 'Continue'
5.7)Configure network 'domain' . you can skip if you want. Then 'Continue'
 |
| Network domain |
5.8)Configure root password for Kali Linux.Make sure you remember your root password .Press 'Continue' for root password verification
 |
| root password |
 |
| verify root password |
5.9)Configuring the clock
 |
| Choose your state |
5.10)Choose 'Guided-use entire disk' . For more information on other selection, please visit here.
5.11)Choose disk to partition.
5.12)Choose 'All files in one partition (recomended for new users)'
5.13) Choose 'Finish partitioning and write changes to disk'
 |
| Confirm and finished |
5.14) Choose 'Yes' .The system will then begin to install and will prompt if needs any feedback from the user.
5.15) You will be prompted with using Network mirror ,I Choose 'No' in this steps.It will continue to install.
(p/s: I think I should choose 'YES' on this step as I face some linux headers issue when creating kali linux guest addition .I will share it in my next post .Please let me know how you go on this step)
 |
| Network mirror |
5.16)The system will then ask to install GRUB boot loader to master boot record. Choose 'Yes' . It will complete the installation and will then request for system reboot.Choose 'Continue'
 |
| System reboot |
6. Reboot and login to Kali Linux Virtual Machine
6.1) Choose the top 'Debian GNU/LINUX , with 3.14-kali-686-pae'
6.2)Click 'Other' and key in 'root' as username. The system will then request for password .
 |
| Click Other |
 |
| Username = root |
 |
| Enter Your password |
6.3)It will redirect you to Kali Linux in your virtual machine
 |
| Welcome Kali Linux |
,


