Saturday, December 28, 2013

How to use Aircrack-ng 1.2 to crack WPA2 password


   In this tutorial, I'm going to share on How to crack a WPA/WPA2 password using Aircrack 1.2 program. This tutorial is a continuation from my previous post . You can read the differences on WPA/WPA2 here.   

  Before you continue with the tutorial, you need to have a wireless card that support for packet monitoring and injection.In this tutorial, I'm using TL-WN722N TP Link USB wireless card that come with atheros chipset. By default this card will work great with the default "ath9k" driver that come with Ubuntu 12.04 LTS package.


What you need

1.Working wireless card
2.Aircrack -ng suite installed on your system (check my previous post )
3. Word list dictionary to crack

Steps

1.Turn on the Wireless card to monitor mode (airmon-ng)
2. Discover the existing Wi-fi network (airodump-ng)
3. Sniff and capture packet for the desired Access Point  (airodump-ng)
4.Inject packet to clear the ARP cache and wait for client and AP authentication. (aireplay-ng)
5. Make sure you capture the "EAPOL"protocol
6.(OPTIONAL) Make a new folder and copy the word list dictionary into it .
7.Crack it!!
8.Test it!!! 


Steps by steps

1.Turn on the Wireless card to monitor mode

1.1 start interface to monitor the network

shark_attack@Positive-Space:~$ sudo airmon-ng start wlan1

Enable wireless card monitor mode

1.2 (OPTIONAL) changing the MAC address. Normally, I change the MAC address because I can know which Access Point (AP)  I'm connected to when I run "airodump-ng" . In the video I change the MAC to 00:11:22:33:44:55 .

shark_attack@Positive-Space:~$ sudo ifconfig mon0 down
shark_attack@Positive-Space:~$ sudo macchanger -m 00:11:22:33:44:55 mon0
shark_attack@Positive-Space:~$ sudo ifconfig mon0 up


Changing the MAC address

2. Discover the existing Wi-fi network (airmon-ng)

shark_attack@Positive-Space:~$ sudo airodump-ng mon0

Wi fi Network Discovering

You can use this command to monitor all the available network around your area. This information help you to determine the network that you want to crack .Please check below table on details of the information return by "airodump-ng" command . Thanks Aircrack-ng website for the below table.

BSSIDThe MAC address of the AP
PWRSignal strength. Some drivers don't report it
BeaconsNumber of beacon frames received. If you don't have a signal strength you can estimate it by the number of beacons: the more beacons, the better the signal quality
DataNumber of data frames received
CHChannel the AP is operating on
MBSpeed or AP Mode. 11 is pure 802.11b, 54 pure 802.11g. Values between are a mixture
ENCEncryption: OPN: no encryption, WEP: WEP encryption, WPA: WPA or WPA2 encryption, WEP?: WEP or WPA (don't know yet)
ESSIDThe network name. Sometimes hidden
                                      Upper data show the available Access Point


BSSIDThe MAC of the AP this client is associated to
STATIONThe MAC of the client itself
PWRSignal strength. Some drivers don't report it
PacketsNumber of data frames received
ProbesNetwork names (ESSIDs) this client has probed
                              Lower data show the available client

If you change your MAC address and connected to the Access Point, you can detect easily which AP you are connected to . Look for active connection with active user .


3. Sniff and capture packet for the desired Access Point  (airodump-ng)
Once you know which Access Point you want to crack, next step is run a command to  sniff and capture the network.

shark_attack@Positive-Space:~$ sudo airodump-ng --bssid 9C:D3:6D:1A:1C:54 --channel 9 -w supermanbatman mon0 

This command will monitor the AP with MAC address 9C:D3:6D:1A:1C:54 on channel 9 and will capture and write the sniffed information to supermanbatman file .
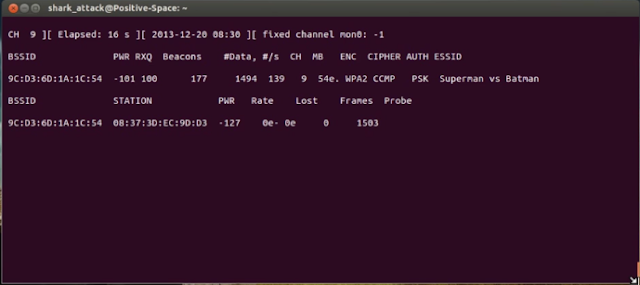

sniffed network information


4..Inject packet to clear the ARP cache and wait for client and AP authentication. (aireplay-ng)

Open a  new terminal and run

shark_attack@Positive-Space:~$ sudo aireplay-ng -0 3 -a 9C:D3:6D:1A:1C:54 -c 08:37:3D:EC:9D:D3 --ignore-negative-one  mon0 

This command will inject 3 fake deauthentication packet to the client. In this example my client is the one that having 08:37:3D:EC:9D:D3 MAC address . "ignore-negative-one" is a miscellaneous command to ignore the mismatch if the interface's channel  can't  be  determined.


Successfull packet injection

 Once the packet is injected, the active client connection will be disconnected from the AP. Most of today computer will auto connect the AP because of the client system password saving function . After you done with the injection,let the packet capturing run for a while. This is important so that you capture  the AP authentication information that it send to the client .How long you need to wait ?? The rule of thumb that I use, you need to monitor the active packet transmission between the client and the AP . An active connection mean that the client user is actively using the connection. This mean that he has successfully connected to the AP.


5. Make sure you capture the "EAPOL"protocol
Check the captured data with Wireshark  for "EAP" protocol. "EAP"  is stand for Extensible Authentication Protocol "EAP" only defines message formats. Protocol that uses EAP defines a way to encapsulate EAP messages within that protocol messages within that protocol messages.  "EAPOL"  stand for Extensible Autehntication Protocol Over LAN .Please read more here . Make sure you have this information to proceed to next step.

EAPOL messages
6. (OPTIONAL)Make a new folder and copy the word list dictionary into it .
In the video that I made, I compile everything in one folder for the sake of tutorial. If you know where is the location you stored the  dictionary, you can straight away type in the terminal . For those who don't have any word dictionary,  you can download it here .


7.Crack it!!
Once you have all the necessary requirement, here is the part where you will crack the file! .
the cracking result will depend on your Word list dictionary and your system processor speed. If you have a massive collection of word dictionary, you will increase the probability to get it crack  . If you are lucky, you able to get the password crack within few minutes and can go up on to few hours/days or else your system  will just return "No  Key Found".


shark_attack@Positive-Space:~/supermanbatman$ sudo aircrack-ng -w darkc0de.lst supermanbatman-01.cap

Cracked password!
8.Test it!!! 
The last and final step is test the new password with the AP!! :-)


If you want to view my captured file, please download it here .:-)

Wednesday, December 25, 2013

How to change Blogspot/Blogger domain URL to custom domain URL


   The new year is just around the corner, some of you out there might be thinking of updating their blog domain name to other URL . There are a lot of reason why getting your own domain  is encourage .You can have a read on what other blogger wrote about this topic  . Personally ,why I want to change my current blog name  because of the "name branding" and "URL promotion" attach to it  .

  In this tutorial, I'm going to share how you can change your blogger domain to custom domain URL . I will use the existing blogger free hosting function and will only change the site URL. I used Go daddy as my domain registrar. There are quite a few out there registrar for you to choose. If you are planning to use Go Daddy ,please use my ref feral  by quoting "WOWG33ky" .You will be getting 20% out off your purchase. Once you completed the linking between your new domain URL and Blogspot/Blogger hosting, you  don't need to do anything on your previous post. It will be updated automatically.

Below are what you will be doing throughout this tutorial .

Steps

1. Purchase a domain name
2. Link the new domain URL to Google domain server .
3. Save the setting in Blogspot.


Steps by steps :)

1.Purchase a domain name . You  are free to choose to buy  a domain name from any domain registrar .Below is quick suggestion that you can look into .
I will not write in detail on how you can do this  as it will use different interface for registration on different registrar . But the idea of it should be similar .You can refer it to my video for guideline

2. Link the new URL to Google server.

2.1 On Blogger ,go to 'Blogger>Settings>Basic ' fill in box for  your new registered domain URL . Then click save . The system will give an "Error 12 "  and you will be assign with  CNAME details. CNAME stand for Canonical Name record which is a resource record in the DNS .It is used to specify that a domain name uses the IP address of another domain .For more information,you can read here.

Click save to get this information
Pay attention to the second line in the  of the  CNAME. This is name and where it pointed to is unique to every user. 

CNAME assigned


2.2. Login to your domain account and update the  CNAME  details. "edit" the  DNS zone file. Below is snapshot from Go Daddy DNS zone.


Go Daddy classic DNS editor


2.3 Look for CNAME table  and update the information from the Blogspot. Click the "pencil" sign to edit the "www" detail.

CNAME  detail update in Go Daddy account


For the unique name and pointed field, click  "Quick add"  and add it on . Make sure both details are update in CNAME information table .

Updated CName


2.4(OPTIONAL) Updating the "A records" . A records is a table of IP address that will point to Google server. If you skip this step, whenever a visitor looking for your page who leave the "www" ,it will show as an error page. To point it to Google server IP, you need to add  below IP . 

216.239.32.21
216.239.34.21
216.239.36.21
216.239.38.21
Updated A records


Don't forget to save the file

3. Save your setting in the Blogspot . If you do everything correctly,the server will notified your new URL and  "Error 12" will be  remove. 

Blog setting


4.Test your new link . It should work

Woo hooo!! your new domain

That's it for now. Drop some comment and have a good day!!


Friday, December 20, 2013

How to run Wireshark for non root user on Linux Debian (Ubuntu 12.04)


    Wireshark is a network packet analyzer that widely use in the technical community to capture and analyze packet.Wireshark can be use to capture most type of known packet protocol and the software development is still on going. In this post, I'm going to share how you can run Wireshark without using root on your Debian Linux system .

    In order for Wireshark to capture packet in Linux, we always need to run it as root. This practice is not advisable to use because Wireshark will capture raw packet from the network. By running as root,it open an opportunity for our system to be exploit . A successful exploit will have an immediate control of our  whole system, compromising it completely. For this reason we must be careful when running Wireshark . For further reading on this topic, you can find it   here.

   To solve this problem, we need to know that Wireshark used a program call  "dumpcap"  to capture  real life traffic. "dumpcap" is a network traffic dump tool that let your machine  capture packet data from a live network and write the packets to a file. "Dumpcap"'s default capture file format is pcap-ng format. By configuring this program accessible to non root user, we can solve this issue.

  Since I don't use root to do my job, below is how I configure my system  machine to run with Wireshark. In the example below 'shark_attack'  is my username.Change it to your non user root username .

shark_attack@Positive-Space:~$ sudo chgrp shark_attack /usr/bin/dumpcap
shark_attack@Positive-Space:~$ sudo chmod 750 /usr/bin/dumpcap
shark_attack@Positive-Space:~$ sudo setcap cap_net_raw,cap_net_admin+eip /usr/bin/dumpcap

   After you have configure this, try to run your Wireshark .This trick should work. There is also other solution that you can use. Please check it out here .

That's it for now .Please subscribe this page and drop some comment  on the box below.

Monday, December 16, 2013

How to write VNC server (Raspberry Pi) startup and VNC client script


   In this post, I'm going to share  how to write a  VNC server start up script and client script. Before you continue with this tutorial, please make sure that your VNC server and client is working.You can check how do I do it in my previous post here.

   What will be accomplish by running this script on your VNC server (Raspberry Pi) is your Pi will automatically run at boot time.You can straight away  log in to your Pi from your system (client) once it is booted  up.Client side script is optional.I do it because I'm too lazy to remember the setting and need more space in my brain :-).

   I  used "case " statement for control structure on both server and client side. I use text editor on the client side and nano editor on server side to edit the script. You can download the full script at the end of this tutorial. Below are the steps I took to do this script .

1.Client

    I save this script in a folder that I normally put my script in .Visit my previous post on how do I do it . I name this script as "pi" .


Pi script piece by piece
------------------------
1.1) The script start off like normal script header

#!/bin/bash
#Title : Client VNC viewer login
#Author :Nerverwreck
#Website :http://www.geckogeeky.blogspot.com
#Date :December 2013
#Rev :0.1


1.2)It continue to the main content of the script .This script will only have 3 case to be select from . Once the user choose to select the case, it will automatically execute the following bash command.To execute this script,you need to type on terminal " pi [-selection ] ".The "$1" sign will take the input directly from the teminal.

If the user enter command that is not in the case, the "*" sign will execute its command by stating how to use the script.

case "$1" in
    -ping)
    echo "Ping to Pi VNC Server"
    ping 10.42.0.68                             # 10.42.0.68 is my Pi IP replace with your server IP
    ;;

    -ssh)   
    echo "SSH to Pi VNC Server"
    ssh 10.42.0.68 -l pi
    ;;

    -vnc)
    echo "Remote login to Pi "
    vncviewer 10.42.0.68:1 -geometry 1280x800  # use geometry to define your display
    ;;

    *)
    echo "`basename $0`:usage:[-ping][-ssh][-vnc]"
    exit 1
    ;;
esac
exit 0


2.Server

   On server part, you need to store the script in "/etc/init.d"  .This folder consist of file that will be execute during the boot time . I name this script as "autovnc"

pi@raspberrypi ~ $ cd /etc/init.d


Autovnc script piece by piece
---------------------------------
2.1) start off as a normal script header


#!/bin/bash
#/etc/init.d/autovnc
#Author :N3rv3wreck
#Website :htttp://geckogeeky.blogspot.com
#Date :December 2013
#Rev 0.1

2.2) For Debian base Linux distro, we must include in this header as a part of boot up script. If you miss this part on the script, It will pop up 'LSB missing 'warning when you want to configure it to run at boot up. For more information, you can visit here .


### BEGIN INIT INFO
# Provides:          Auto VNC server startup at boot
# Required-Start:    $remote_fs $syslog
# Required-Stop:     $remote_fs $syslog
# Default-Start:     2 3 4 5
# Default-Stop:      0 1 6
# Short-Description: Start VNC server daemon at boot time
# Description:       Enable service provided by daemon.
### END INIT INFO

2.3)Changing the folder . to where you install the VNC server program . in my script i wrote as

VNCUSER='pi'
eval cd ~$VNCUSER

eval command will takes a string as its argument, and evaluates it as if you'd typed that string on a command line.

    You can use other method in doing the same job as above. The idea of both line above is finding the location of  ".vnc" file. I installed the program in my home folder .In this case, I set my Pi username  as "pi" .You will have the same location as me if you follow my tutorial . You can use below command as a substitution of above two line.

cd /home/pi

2.4) Main content of the script. Basically the script idea is similar to what we have on client side. To execute the file  we need to run as "./autovnc [selection] " . In autovnc, there is "start" and "stop"  selection. By running "start" command, it will start the server and enabling it at display :1 with the screen size 1280x600 .

   The server will be kill if we choose  the  "stop"  case.

case "$1" in
        start)
        echo "Waddap..Im starting the VNC Servo!"
         su $VNCUSER -c  '/usr/bin/vncserver :1 -geometry 1280x800'
        ;;

        stop)
        echo "Hey..Im gonna stop the VNC Servo Yo!"
         /usr/bin/vncserver -kill :1
        ;;

        *)
        echo "`basename $0`:usage:[start][stop]"
        exit 1
        ;;
esac
exit 0

If you use " cd/home/pi" in changing the folder, you can substitute
su $VNCUSER -c  '/usr/bin/vncserver :1 -geometry 1280x800'
with
su pi  -c '/usr/bin/vncserver :1 -geometry 1280x800'   


3.Testing the script
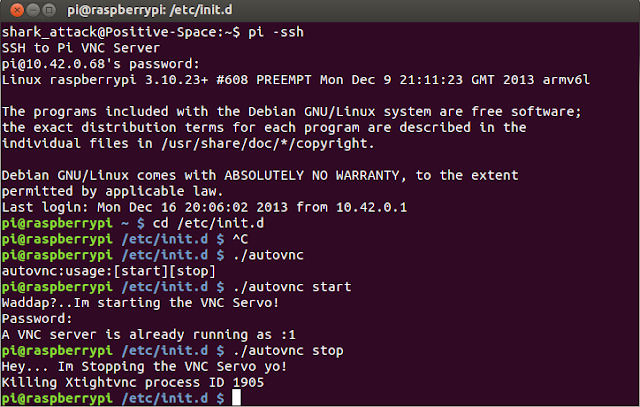
 After finish configuring, you can try and run the command  by using"./autovnc  start" or "./autovnc stop" command.

Testing VNC server script 


4.Update the script to be include during the boot time .
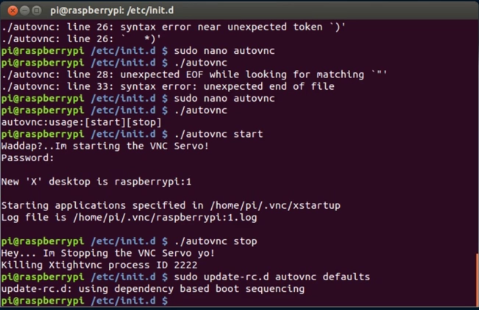
 pi@raspberrypi /etc/init.d $ sudo update-rc.d autovnc defaults
 
success configuring init file


reboot the server.

pi@raspberrypi /etc/init.d $ sudo reboot

5. You can now then try to log in to your  pi from you client.

shark_attack@Positive-Space:~$ pi -vnc

VNC to your server

 What do you think about this tutorial?To download the full script,please click here  . Please subscribe this page and leave comment in the box below

  Visit my other post on How to use voice to login your remote server and do other basic system control stuff. Click here .

.

Friday, December 13, 2013

How to run Raspberry pi without additional hardware only using ethernet cable on Ubuntu .


    When I got my hand on Raspberry Pi, I think it's a bugger that I need an extra keyboard,hdmi cable and monitor to make it run. Since I connect my laptop to the internet using  wireless usb , I can make use of my free ethernet port to connect directly to pi.

      In this post, I'm going to share how we can run Raspberry pi without additional  hdmi,keyboard,mouse  . All you need is laptop, wireless internet connection ,an ethernet cable and a running Raspberry Pi . If you have an empty sd card without any OS in it, Please visit my previous post on how you can write to your SD card .

    The idea behind this project  is that, I can make my system run as an Access point to my Pi.I will use a lightweight DHCP,DNS,TFTP server function call Dnsmasq .I will share my internet connection with Pi and my system will assign a DHCP IP to it. Once we know the Pi IP, we can directly SSH to the Pi and install VNC server application. We should be able then to remotely log to Pi from our system. To cut everything short I summarize steps in points below.

What you need?

1. Laptop
2.Wireless internet connection
3.Ethernet cable
4. Raspberry Pi 


Steps
-
1. Prepare setup as below photo. You can use your builtin  wireless card for this project.


Network setup
.

2.Share Internet connection with the Pi
Share internet with other computer


3.Get the Raspberry Pi IP assign by our system . in my case, my Pi IP is 10.42.0.68

shark_attack@Positive-Space:~/Programming/bash$ cat /var/lib/misc/dnsmasq.leases

Raspberry Pi IP address assign by System


4.SSH to Raspberry Pi

 shark_attack@Positive-Space:~/Programming/bash$ ssh 10.42.0.68 -l pi


Connect to  Pi via ssh command

5.(Optional) If this is the first time you login to your Pi,you can choose what selection  you want for your Raspberry Pi  .For more information on this, you can visit here . We can always go back to config mode whenever we want later on by typing "sudo raspi-config" on terminal.
Raspi config

After finish, Choose to reboot system. Your new configuration will take effect after reboot

6. Install VNC server application to Pi .

pi@raspberrypi ~$ sudo apt-get install tightvncserver


Installing Raspberry Pi VNC server
7.Configure the password for remote access and enable the  vncserver at display 1 .
pi@raspberrypi ~$ vncserver :1

8.Install VNC client application on your system
shark_attack@Positive-Space:~$ sudo apt-get install xtightvncviewer

Installing xtightvncviewer on Ubuntu


9.Remotely login Raspberry Pi.
shark_attack@Positive-Space:~$ sudo ssh 10.42.0.68 -1 pi

10.Enter your Pi IP ,display port "10.42.0.68:1"  follow with  "password ".


11.You should be able to remote login  your Pi .

Walla..


    I found one website that connect their Mac computer to Pi using the same way as I did.Please visit the link Raspberry Pi Macgyver style


That's it for today. Drop some comment below and have a good day . :-)

My Pi setting