Thursday, August 6, 2015

How to set and run internal DHCP Virtual Network on CentOS,Kali Linux and, Windows in VirtualBox. Practical example .


Internal DHCP Virtual Network in Virtualbox


   This post will cover practical example on how to run Internal Dynamic Host Configuration Protocol (DHCP) Virtual Network in CentOS,Kali Linux and Windows in Virtualbox . It shows how to set Virtualbox and check the Guest OS communication in the virtual network and Wide Area Network (WAN).


   In a nutshell, Internal Virtual Network  settings  will allow  Guest Operating System (OS) run as a real computer internally within virtual network.Guest Operating System (OS) will able to communicate between each other but can't communicate with outside world (internet)  or Wide Area Network (WAN) .

  The testing that had been done for this tutorial is using  virtualbox dhcpserver function. Virtualbox dhcpserver will  assign the IP addresses for each Guest OS . Once Guest OS is set to run in similar network name , Internal Virtual Network will wire automatically. Virtualbox will automatically load the network driver ,assign IP address to each Guest OS and act as a complete network switch .


Below is the environment that I use for this tutorial

  1. Ethernet/Wireless router
  2. Ubuntu ( Host running on Virtualbox )
  3. Kali Linux (Guest OS 1)
  4. CentOS (Guest OS 2)
  5. Windows(Guest OS 3)

Internal Virtual Network Diagram

  Below is the network topology  for Virtualbox Internal DHCP Virtual Network.Kali Linux, CentOS and Windows connection only happens virtually where there is no physical wiring between them.IP addresses will be assigned by Virtualbox DHCP server. 


  Since the IP addresses are assigned by Virtualbox DHCP server , you will have different IP addresses than what I get in this tutorial.


1) Enable Virtualbox DHCP server in the host.)


1.1) To enable the DHCP server, you need to enable it via command line in host machine. The preceding command will configured below details on your system.


Network name :                   Pentestlab 
DHCP server IP address  :    10.10.10.1
Network mask :                   255.255.255.0
Guest OS lower IP address : 10.10.10.2
Guest OS upper IP address : 10.10.10.10


2) Internal Network Virtualbox settings .


2.1) Go to "Settings>Network>Adapter 1"  and attached the adapter to  Internal Network.


2.2) Assign the network name for your guest OS. In this example, I have set and configured  (in 1.1) my internal network name to "Pentestlab" .Configure the same network name as what is configured in Virtualbox host.


All three Guest OS have the same settings as I show above.

3) Run Guest Operating System (OS) and test the network.

 Run CentOS,Windows and Kali Linux Virtual Machines.


3.1) DHCP server will assign each Guest OS IP address automatically . Below is IP addresses assign to my Guest OS machine.


Windows :   10.10.10.2
Kali Linux : 10.10.10.3
CentOS :      10.10.10.4


3.2) Display Windows IP address and send  ping packet to Kali Linux (10.10.10.3) and CentOS (10.10.10.4)  to make sure they are connected.


3.3) Display Kali Linux IP address and send  ping packet to  Windows (10.10.10.2) and CentOS (10.10.10.4) to make sure they are connected.


3.4) Display CentOS IP address and send ping packet to Windows (10.10.10.2) and Kali Linux (10.10.10.3) to make sure they are connected.


3.5) Browse/ping any domain in the internet to check the connection to Internet/WAN.


Kali Linux unable to ping google


CentOS unable to ping google


Windows unable to browse Internet


By default, in Internal DHCP Virtual Network, all  three Guest OS must be able to communicate with each other but not to Wide Area Network (WAN) or the internet.


Conclusion.

  1. Internal Virtual Network configuration will allow guest OS connect to each other and are limited within the host configured network.
  2. Guest OS are not able to connect to Internet/Wide Area Network (WAN) .
  3. Advantage of using this setting is It is easy to setup and reduce the hassle of configuring each static IP addresses for multiple computer in lab network. 
  4. No outside real world connection makes it easy to do real world  testing in a secure environment .


For more information on this topic,please visit here

Tuesday, June 30, 2015

How to set static IP address and networking details in Kali Linux


  In this post, I'm going to share on how to set static IP address and networking details in  Kali Linux.

Steps

1) Open the terminal and check  network interface file .


2) Edit "/etc/network/interfaces" file.


orca@omura:~$ sudo gedit /etc/network/interfaces                                           


3) Disable "dhcp" and update the network static IP address information in the file and "save"


 4) Refresh the connection by running  "ifdown eth0" to turn off the network interface and "ifup eth0" command to turn on the network interface .


orca@omura:~$ sudo ifdown eth0                                                                     
orca@omura:~$ sudo ifup eth0                                                                           

5) Kali Linux should run on static IP address .


Read Previous : How to save time doing passive discovery in Kali Linux using discover or bactrack script framework

Monday, June 29, 2015

How to set static IP address in CentOS using graphical user interface (GUI)


   In this post, I'm going to share on how to set static IP address in CentOS using graphical user interface (GUI)

Steps

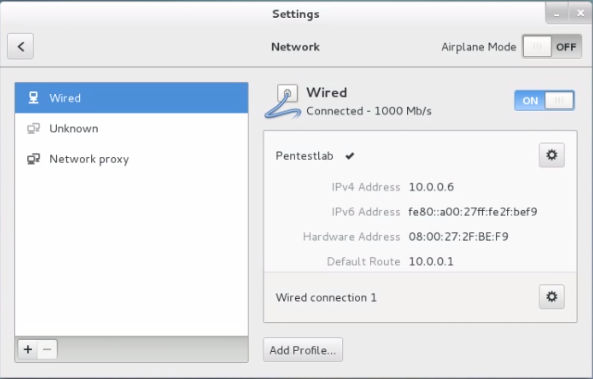
1) Open the networking panel by clicking network setting.


2) Click "add profile" to add a new static IP address profile


3) Click "identity"  and give the connection a name .


4) Click "IPV4" and change the Addresses to "manual"


5) Key in your new network and static IP address setting then click "Add"


6) Make sure the new connection is connected.


7) Check the new static connection from the terminal


Read Previous : How to install CentOS in Ubuntu Virtualbox (steps by steps)

Read Next :How to install CentOS Guest Addition in Ubuntu Virtualbox

Friday, June 26, 2015

How to set and run Bridge Virtual Network on CentOS,Kali Linux, Windows in VirtualBox. Practical example .


Bridged Virtual Network in Virtualbox

    This post will cover practical example of how to run Bridged  Network on CentOS,Kali Linux and Windows in Virtualbox . It shows on how to set Virtualbox and check the Guest OS communication between each other.

  In a nutshell, Bridged Network Virtualbox settings  will allow  Guest Operating System (OS) run as a real computer in your home network. Once enabled, Guest OS can be accessed from Internet as a real computer machine. contrary to Network Address Translation (NAT) network setting, Bridged Network will get an IP address in a similar subnet with the host .These IP addresses is assigned  from the Wireless/Ethernet router.

   In Bridged Network,Virtualbox software intercepts data from the host physical network adapter and inject data into it. Virtualbox utilize the host network driver or also known as "net filter" to send and receive data from the adapter. The router sees Guest OS that connected in this way as a real computer connected via Ethernet cable or wireless connection.

Below is the environment that I use for this tutorial
  1. Ethernet/Wireless router
  2. Ubuntu ( Virtualbox Host )
  3. Kali Linux (Guest OS 1)
  4. CentOS (Guest OS 2)
  5. Windows(Guest OS 3)

 Virtualbox Bridged Network Diagram

  Below is the network topology in Virtualbox.Kali Linux, CentOS and Windows connection only happens virtually where there is no physical wiring between them.IP address will be assigned by Ethernet/Wireless Router. Make sure you enable DHCP function on your Ethernet/Wireless router.


 Since the IP address is assigned by the router, the IP address will be assigned differently for each user.


Bridged Virtualbox setting

1) Enable Bridged network setting in Virtualbox for Windows,Kali Linux and CentOS . Go to "Settings>Network"


Wlan1 is how the host connect to Internet


 2) Run all three Guest OS . Once all three Guest OS is up and running, check each Guest OS IP address and ping other Guest OS to make sure they can communicate .


 3) Check IP address for Windows,Kali Linux and CentOS .All the Guest OS will get it's IP address assign from  Ethernet/Wireless Router .

3.1) Windows  IP address is "192.168.0.9" . Ping Kali Linux and CentOS  respectively


3.2) Kali Linux IP address is "192.168.0.10" . Ping Windows and CentOS respectively.


3.2) CentOS IP address is "192.168.0.11" .Ping Kali Linux and CentOS respectively.


4) Try to browse internet from your Guest OS .


Conclusion

  1. Bridged network allow Guest OS connect to internet as a normal computer
  2. Bridged network IP address is assigned by Ethernet/Wireless router
  3. Guest OS able to communicate with each other .

Saturday, June 20, 2015

How to set and run NAT Virtual Network on CentOS,Kali Linux, Windows in VirtualBox. Practical example .


Network Address Translation (NAT) Virtual Network in Virtualbox

  This post will cover practical example of Network Address Translation (NAT) network settings in Virtualbox . NAT is the default network configuration for any guest operating system (OS) in Virtualbox, . This setting will allow virtual machine connect to internet and user can browse and use the machine as a normal computer.

 Virtualbox networking engine, will assign every guest OS with an IP address . Virtualbox networking engine treat each guest operating as a separate private network and they can't communicate with each other .In addition to that the  IP address assigned from Virtualbox Networking Engine is unreachable from outside (internet).

   A guest OS with NAT enabled will redirect it's data through a Virtualbox Networking Engine.Virtualbox will then maps the data using the host Wireless/Ethernet card and then will redirect to guest operating  system. In other words, virtual box networking engine will extract TCP/IP frames and will redirect  to each guest operating system.


Below is the environment that I use for this tutorial
  1. Ethernet/Wireless router
  2. Ubuntu ( Virtualbox Host )
  3. Kali Linux (Guest OS 1)
  4. CentOS (Guest OS 2)
  5. Windows(Guest OS 3)
Virtualbox NAT Network Diagram

  Below diagram shows NAT network topology in Virtualbox.Kali Linux, CentOS and Windows connection only happens virtually where there is no physical wiring between them . Each connected guest OS will get it's IP address assigned from Virtualbox networking engine .


NAT Virtualbox setting 
1) By default NAT setting is pre configured in Virtualbox ,You can view this setting under "Settings>Network"


  Because each guest OS will be on their own private network,you can use similar adapter settings for all three guest OS. These guest OS will get similar IP address because of this.


 2) Run Kali Linux, CentOS and Windows guest operating system


 3) All three guest operating system will get a similar IP address of  "10.0.2.15" .


Windows IP


CentOS IP


Kali Linux IP address
 As you can see in above example, virtualbox networking engine  treat all three guest OS as different entity all together running on their own private network. None of these guest OS are connected and they can't communicate with each other.


 Guest Operating System IP address with different adapter setting in Virtualbox.

  In this example ,I set different adapter setting to each guest OS and different IP address is assigned to each guest OS.

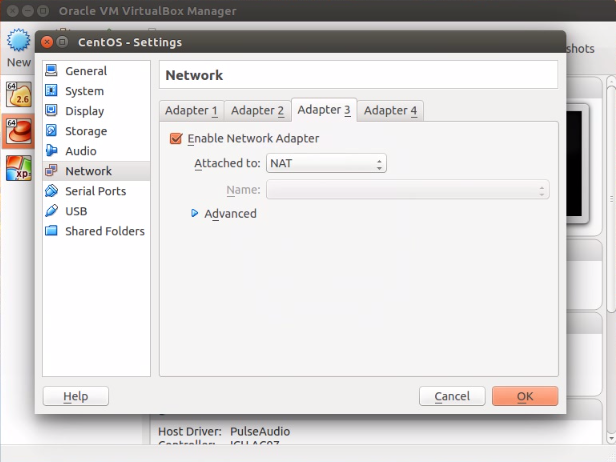
1) Adapter 2 to Kali Linux guest OS . Kali Linux gets  "10.0.3.15" IP address


2) Adapter 3 to CentOS guest OS .CentOS gets "10.0.4.15" IP address .


CentOS IP address


3) Adapter 4 to Windows guest OS.Windows gets "10.0.5.15" IP address .


Conclusion

  1. NAT configuration will allow guest OS connect to the internet and work as a normal computer
  2. Guest OS with NAT enable configuration are not connected with each other.
  3. Different adapter setting will give different IP address to connected guest OS respectively.
  4.  Guest OS is unreachable from Wide Area Network (WAN)


For more information on this topic,please visit here