Tuesday, June 30, 2015
How to set static IP address and networking details in Kali Linux
In this post, I'm going to share on how to set static IP address and networking details in Kali Linux.
Steps
1) Open the terminal and check network interface file .
2) Edit "/etc/network/interfaces" file.
orca@omura:~$ sudo gedit /etc/network/interfaces
3) Disable "dhcp" and update the network static IP address information in the file and "save"
4) Refresh the connection by running "ifdown eth0" to turn off the network interface and "ifup eth0" command to turn on the network interface .
orca@omura:~$ sudo ifdown eth0
orca@omura:~$ sudo ifup eth0
5) Kali Linux should run on static IP address .
Read Previous : How to save time doing passive discovery in Kali Linux using discover or bactrack script framework
Monday, June 29, 2015
How to set static IP address in CentOS using graphical user interface (GUI)
In this post, I'm going to share on how to set static IP address in CentOS using graphical user interface (GUI)
Steps
1) Open the networking panel by clicking network setting.
2) Click "add profile" to add a new static IP address profile
3) Click "identity" and give the connection a name .
4) Click "IPV4" and change the Addresses to "manual"
5) Key in your new network and static IP address setting then click "Add"
6) Make sure the new connection is connected.
7) Check the new static connection from the terminal
Read Previous : How to install CentOS in Ubuntu Virtualbox (steps by steps)
Read Next :How to install CentOS Guest Addition in Ubuntu Virtualbox
Friday, June 26, 2015
How to set and run Bridge Virtual Network on CentOS,Kali Linux, Windows in VirtualBox. Practical example .
Bridged Virtual Network in Virtualbox
This post will cover practical example of how to run Bridged Network on CentOS,Kali Linux and Windows in Virtualbox . It shows on how to set Virtualbox and check the Guest OS communication between each other.
In a nutshell, Bridged Network Virtualbox settings will allow Guest Operating System (OS) run as a real computer in your home network. Once enabled, Guest OS can be accessed from Internet as a real computer machine. contrary to Network Address Translation (NAT) network setting, Bridged Network will get an IP address in a similar subnet with the host .These IP addresses is assigned from the Wireless/Ethernet router.
In Bridged Network,Virtualbox software intercepts data from the host physical network adapter and inject data into it. Virtualbox utilize the host network driver or also known as "net filter" to send and receive data from the adapter. The router sees Guest OS that connected in this way as a real computer connected via Ethernet cable or wireless connection.
Below is the environment that I use for this tutorial
- Ethernet/Wireless router
- Ubuntu ( Virtualbox Host )
- Kali Linux (Guest OS 1)
- CentOS (Guest OS 2)
- Windows(Guest OS 3)
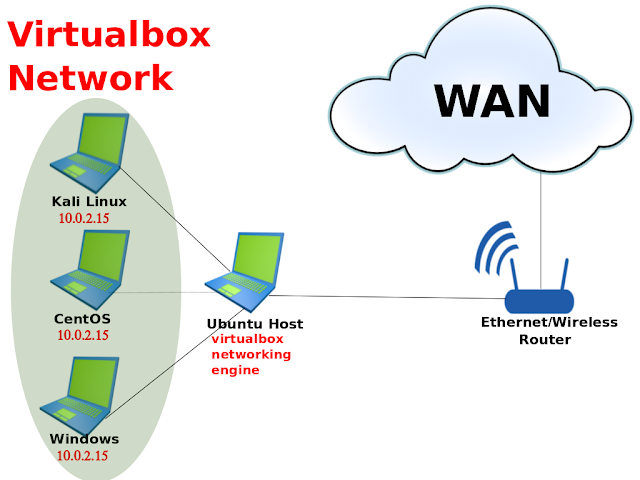
Virtualbox Bridged Network Diagram
Below is the network topology in Virtualbox.Kali Linux, CentOS and Windows connection only happens virtually where there is no physical wiring between them.IP address will be assigned by Ethernet/Wireless Router. Make sure you enable DHCP function on your Ethernet/Wireless router.
Since the IP address is assigned by the router, the IP address will be assigned differently for each user.
Bridged Virtualbox setting
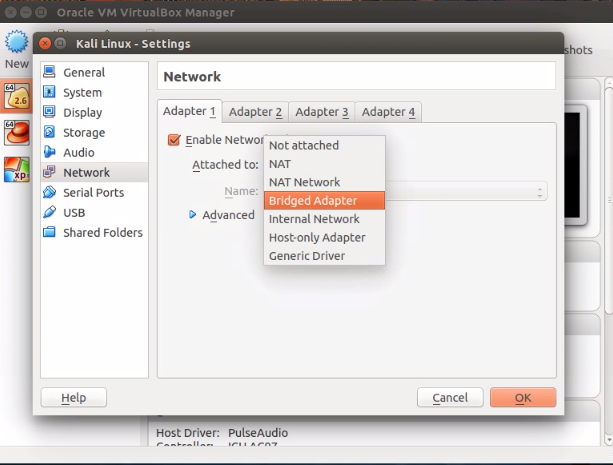
1) Enable Bridged network setting in Virtualbox for Windows,Kali Linux and CentOS . Go to "Settings>Network"
 | |
| Wlan1 is how the host connect to Internet |
2) Run all three Guest OS . Once all three Guest OS is up and running, check each Guest OS IP address and ping other Guest OS to make sure they can communicate .
3) Check IP address for Windows,Kali Linux and CentOS .All the Guest OS will get it's IP address assign from Ethernet/Wireless Router .
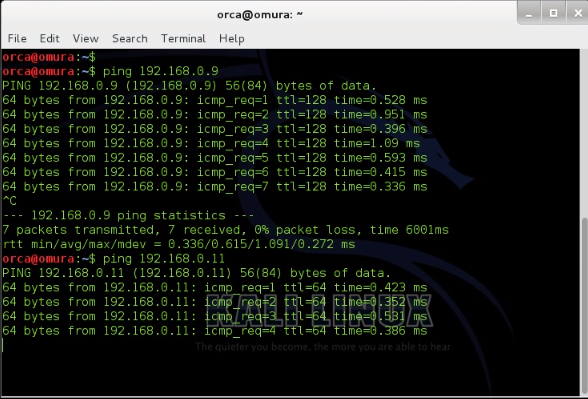
3.1) Windows IP address is "192.168.0.9" . Ping Kali Linux and CentOS respectively
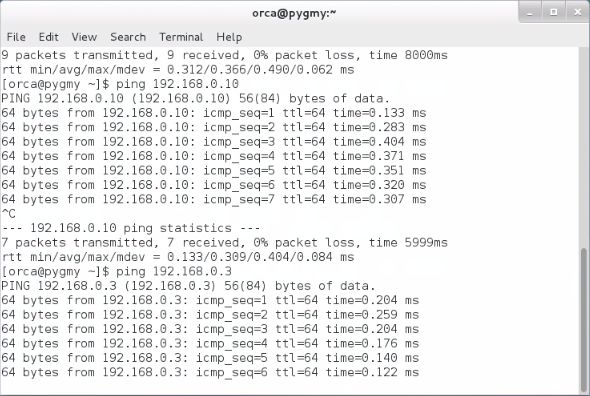
3.2) Kali Linux IP address is "192.168.0.10" . Ping Windows and CentOS respectively.
3.2) CentOS IP address is "192.168.0.11" .Ping Kali Linux and CentOS respectively.
4) Try to browse internet from your Guest OS .
Conclusion
- Bridged network allow Guest OS connect to internet as a normal computer
- Bridged network IP address is assigned by Ethernet/Wireless router
- Guest OS able to communicate with each other .
For more information on this topic,please visit here
Read Next : How to set and run Internal DHCP Virtual Network on CentOS,Kali Linux, Windows in VirtualBox. Practical example .
Read Next : How to set and run Internal DHCP Virtual Network on CentOS,Kali Linux, Windows in VirtualBox. Practical example .
Saturday, June 20, 2015
How to set and run NAT Virtual Network on CentOS,Kali Linux, Windows in VirtualBox. Practical example .
Network Address Translation (NAT) Virtual Network in Virtualbox
This post will cover practical example of Network Address Translation (NAT) network settings in Virtualbox . NAT is the default network configuration for any guest operating system (OS) in Virtualbox, . This setting will allow virtual machine connect to internet and user can browse and use the machine as a normal computer.
Virtualbox networking engine, will assign every guest OS with an IP address . Virtualbox networking engine treat each guest operating as a separate private network and they can't communicate with each other .In addition to that the IP address assigned from Virtualbox Networking Engine is unreachable from outside (internet).
A guest OS with NAT enabled will redirect it's data through a Virtualbox Networking Engine.Virtualbox will then maps the data using the host Wireless/Ethernet card and then will redirect to guest operating system. In other words, virtual box networking engine will extract TCP/IP frames and will redirect to each guest operating system.
Below is the environment that I use for this tutorial
- Ethernet/Wireless router
- Ubuntu ( Virtualbox Host )
- Kali Linux (Guest OS 1)
- CentOS (Guest OS 2)
- Windows(Guest OS 3)
Virtualbox NAT Network Diagram
Below diagram shows NAT network topology in Virtualbox.Kali Linux, CentOS and Windows connection only happens virtually where there is no physical wiring between them . Each connected guest OS will get it's IP address assigned from Virtualbox networking engine .
NAT Virtualbox setting
1) By default NAT setting is pre configured in Virtualbox ,You can view this setting under "Settings>Network"
Because each guest OS will be on their own private network,you can use similar adapter settings for all three guest OS. These guest OS will get similar IP address because of this.
2) Run Kali Linux, CentOS and Windows guest operating system
3) All three guest operating system will get a similar IP address of "10.0.2.15" .
 |
 |
| Windows IP |
 |
| CentOS IP |
 |
| Kali Linux IP address |
As you can see in above example, virtualbox networking engine treat all three guest OS as different entity all together running on their own private network. None of these guest OS are connected and they can't communicate with each other.
Guest Operating System IP address with different adapter setting in Virtualbox.
In this example ,I set different adapter setting to each guest OS and different IP address is assigned to each guest OS.
1) Adapter 2 to Kali Linux guest OS . Kali Linux gets "10.0.3.15" IP address
2) Adapter 3 to CentOS guest OS .CentOS gets "10.0.4.15" IP address .
 |
| CentOS IP address |
3) Adapter 4 to Windows guest OS.Windows gets "10.0.5.15" IP address .
Conclusion
- NAT configuration will allow guest OS connect to the internet and work as a normal computer
- Guest OS with NAT enable configuration are not connected with each other.
- Different adapter setting will give different IP address to connected guest OS respectively.
- Guest OS is unreachable from Wide Area Network (WAN)
For more information on this topic,please visit here
Tuesday, June 16, 2015
Linux Bash Shell Tutorial :How to use Pipeline and filters . 8 tips and tricks
In this post, I will share 8 tips that you can use to manage terminal data using pipeline and filters.
1) less Command
less will allow you to quickly browse any file section by section in the terminal (standard output).
In above example,when I piped "lshw" command to "less" command, the output is display section by section. you can use space bar or arrow sign to move to next section of the file to exit you can press "q"
2) Sort command
sort command will sort the output of the first command.
In above example, "lsusb" command list the usb devices connected to my machine. once I pipe it to sort command ,the usb devices is sorted accordingly.
3) grep command
grep command will capture certain file pattern and give the output to the screen
In above example,i want to search for hardware with the specific word "Intel" on it. "lshw" command will list all the hardware on my computer .By pipe it to "grep" command, it will filter the output to only show the line with Intel specific word in it.
4) wc command
wc is a short form of "word count" ."wc" command will display the total line, word and byte count of a file .
In above example, I list usb devices on my computer and filter it through "wc" command. The output of this command will give some numbers referring to line,words and bytes . -l will give the total lines , -m will give the total bytes and -w will give the total words in the file.
5) head command
"head" command will print the first few line that we specified in the terminal.
In above example, I want to display first 4 line of "lsusb" result.to do this I pipe "lsusb" command by using head -(dash) n followed with number 4 .
6) tail command
"tail" command will print the last few line that we specified in the terminal.
To display few lines from the bottom of standard output,you can use tail command to do so. pipe lsusb command to tail command followed with -n and followed with number of lines that you want to display. in this example, I display 3 bottom lines from lsusb output.
7) tee command
"tee" program reads standard input and copies it to both standard output (by allowing the data to continue run down in the pipeline) and to one or more files. This is useful for capturing a pipeline’s contents at an intermediate stage of processing
In above example, I run "lshw" command to list my computer hardware.
tee command save lshw output to lshw.txt file And at the same time the output is send to "grep" command to look for intel word pattern, this command work as a T junction in our terminal.
8) uniq command
"uniq" command is often used in conjunction with sort . "uniq" accepts a
sorted list of data from either standard input or a single filename argument and will remove any duplicate information.
sorted list of data from either standard input or a single filename argument and will remove any duplicate information.
In above example, I list both files in user binary folder and binary folder.
by pipe it through "uniq" command, it will remove all the duplicate files between these two folder.
If you want to see the list of duplicates file instead, you can add -d option to "uniq" command
Read Previous : Linux Bash Shell Tutorial : How to shorten command in Linux Terminal
Subscribe to:
Comments (Atom)


