Wednesday, June 3, 2015

How to install CentOS in Ubuntu Virtualbox (step by step for dummies)


   In this tutorial I'm going to share on how to install CentOS in Ubuntu Virtualbox. Currently CentOS 7 is the latest version in the market. This tutorial can also be used for future reference  .If you don't have Virtualbox installed on your system, visit my old post on how to do this .

Tutorial rundown 
1)Download latest CentOS
2)Setting CentOS desired parameter in Virtualbox
3)Install CentOS
4)Restart and run CentOS from hard drive.

let's  begin .

1) Download latest CentOS .

1.1) Download latest CentOS from the website.


 1.2) Move the file to the location where you want virtualbox to look for.
(I prefer to keep all my image file in one folder)


2) Setting CentOS desired parameter in Virtualbox

  2.1) Name the new  OS and  choose  "Redhat" as OS version.


  2.2) Set the memory size value for this Operating System.


   2.3) Create a virtual hard drive.


 2.4) Choose "VDI" as the hard drive file type.


2.5) Choose the file size .
 

 2.6) Set virtualbox to use the downloaded image file. Go to "Setting>system"  and look for the CentOS image file.


3) Install CentOS

  3.1) Run CentOS in the Virtualbox


  3.2) Since CentOS Live CD doesn't support guest os version in virtualbox, you will be prompted with warning message once you  are in CentOS environment . Basically, once you use mouse to click in the CentOS space, you wouldn't be able to use the mouse on your host system .To use mouse in the host, you need to press  "CTRL"  button on your right hand side. Please read the message for more info.


 3.3) Begin CentOS installation by clicking "Install to hard drive"


 3.3) Choose the language that you will use during the installation and click  "continue"


 3.4) Before you start with the installation, you can customize  Date,Keyboard, installation destination and network host name details .

  
3.4.1) Date and time setting


3.4.2) Keyboard setting


3.4.3) Installation destination and location


3.4.4) Hostname

Once you done playing around customizing installation details, click
 "Begin Installation"


3.5) During the installation process, you need to create  root password and you can also create a user.


3.5.1) Create root password for CentOS . 


3.5.2) Create a user and it's details


3.6) Once installation finish quit the panel .


4) Restart and run CentOS from hard drive.

4.1) Power off Live Cd Centos .


4.2) Make hard disk as the first boot device for CentOS in the virtualbox.
 Go to  "setting>system "  and drag hard disk as a first or second on the list.


4.3) Run CentOS from virtualbox. You will be using the newly installed CentOS .


Login with your newly created  user


Finally :)


Friday, May 8, 2015

Linux Bash Shell Tutorial : How to use I/O redirection.5 tips and tricks


  Understanding Input Output or I/O redirection works in Linux helps us streamline our job better when working with the terminal. In this tutorial,I will share quick tips and tricks on how to use I/O redirection in our system.

A few terminology that will help you understand this tutorial is as below:


Standard Input -what is being type in terminal from keyboard.

Standard output -text that display in terminal on command execution
Standard  error – text that display in terminal when a command runs and exit with an error

Content List

1)Redirecting standard output to a file.
2)Redirecting a file to standard input.
3) Redirecting standard error to a file.
4)Redirecting Standard output and error to one file
5) Disposing unwanted output -/dev/null (bit bucket)


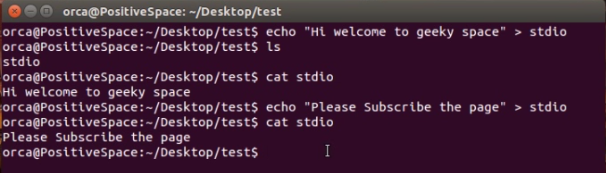
1)Redirecting standard output to a file.


Use “>” operator sign to redirect and save output file in current directory .


To append/update existing file use “>>”


2)Redirecting a file to standard input.

Use  “<” operator to redirect an input to the terminal


In above example, I write new content to file stdin and  redirect stdin file to the terminal  using "<" sign operator.

3) Redirecting standard error to a file.

Use “2>” operator sign to redirect standard error to a new file in current directory.


To append/update existing file use “2>>”


4)Redirecting Standard output and error to one file

Use “&>” operator sign to redirect standard output and standard error to a  new file in current directory .


To append/update existing file use “&>>”


file stdouterr
5) Disposing unwanted output -/dev/null (bit bucket)

Use “2> /dev/null” operator sign to redirect unwanted  output to bit bucket. Data  that are redirect to bit bucket will be deleted without a trace. As such some people also call bit bucket as a black hole.


*NOTE:If you execute the same command using  ">" ,"<" ,"2>" ,"&>"  to same file name but with different content, the file will be overwritten with new file content .

Thursday, May 7, 2015

Linux Bash Shell Tutorial : How to change user terminal password in Ubuntu using command line and GUI


 Changing terminal password is an important  part in managing a Linux system. There will be a time when you want to change terminal password to something more secure or reliable. This tutorial will  guide you on how to change user terminal password using either the terminal command or Ubuntu GUI.

1)Change password from the Terminal

1.1) Run in terminal "passwd" command
orca@Positive-Space:~$ passwd                                                                                                                                        


On running the command, you  will be prompted to enter your new password. Enter your new password to confirm. Your password will be updated  straight away .


2)Change password from Ubuntu GUI

2.1) Search user accounts from Ubuntu dash panel
 Search for User accounts setting panel .


2.2)Click  password panel to change the password.


2.3)Change your password and click "Change"


Logout from the system and  test your new password !! :-)

Tuesday, May 5, 2015

How to delete old kernels in Ubuntu using Ubuntu tweak GUI


  Kernel is an important part of Linux system. When you upgrade to new kernel version, the old kernel will be left in your system . As time goes by, this might consume your hard drive and cause  problem to your system.

  One of the examples that old kernel might do to your system is  the system unable to install update from Ubuntu Software updater. When you click "Install Now" button, an error will occur .

"The upgrade needs a total of 79.0M free space on disk '/boot'. Please free at least an additional 7,381k of disk space on '/boot' .Empty your trash and remove temporary packages of former installation using 'sudo apt-get clean' "


  One of the reasons why this problem happens is because the old kernel images are filling up your  /boot drive partition . 

  There are few ways on how to remove old kernel. In this tutorial, I share on how to remove old kernel file images using Ubuntu Tweak program.The guide below will help you to install and delete old kernels using the program

1) Download Ubuntu Tweak program


 1.1)Download Ubuntu Tweak from their website

Downloading Ubuntu Tweak


1.2)Double click the download file and finish the  installation from Ubuntu Software Centre.


Ubuntu Software Centre


2)Run Ubuntu Tweak and delete old kernels

2.1)Search Ubuntu Tweak from Ubuntu dash panel and run the program.


2.2)On the Top side panel click "Janitor" and tick  "Old kernel"  under System.


2.3)Check your latest kernel version from the terminal by typing

orca@Positive-Space:~$ uname -r                                                                          


2.4) Click the  old kernel  that you want to delete and click "clean"  to delete old kernels. It is a good practice to keep  previous latest old kernel version on your system .


Removing unwanted kernel

Remaining kernel


 3)Reboot your system try to update your system again . ;)


Wednesday, April 22, 2015

How to save time doing passive discovery in Kali Linux using discover or backtrack script framework


   Passive discovery is an activity of looking and searching information about certain organization or a network.While Kali Linux has massive tools that we can utilize to do this, it might take us a lot of time in learning each tools.

  To solve this problem, we can use discover scripts or previously known as backtrack scripts in our Kali Linux system.The  framework was written by
Lee Baird .Discover script not only incorporate various kali tools but it is also easy to use .

   In this tutorial I'll share on how to setup the framework with  Kali Linux  and then I will share on how you can use this framework top ook for a network or any network or company passive information.

1)Installing Discover script

 1.1) Clone git to Kali Linux.

orca@omura:~$ cd /opt                                                                                 
orca@omura:/opt$ sudo git clone https://github.com/leebaird/discover.git   


1.2)Setup and install the necessary file for your system .

orca@omura:~$ cd /opt/discover                                                                             
orca@omura:/opt/discover$ sudo  ./setup.sh                                                           


 2 ) Using the framework for passive discovery

2.1) Go to  discover folder and execute the "discover.sh" file .

orca@omura:~$ cd /opt/discover                                                                             
orca@omura:/opt/discover$ sudo  ./setup.sh                                                           


2.2)The framework will load and you will be given a list of  task that can be executed .Use the number in the left for the selection.


Discover framework

2.3)In this example, I will run a script and get information base on domain , I choose "1" .


discover script selection

 2.4)Then Choose "2" and key in the domain name. in this example, i look for information for "www.google.com" .The framework will then run and execute the required tools for this task.


key in the domain url

2.5) Grab a cup of coffee and enjoy it while the scripts doing it's job. :-)


the system is working hard!


2.5) Upon completing,  the result and report will be prepared and you can view it using internet browser.


2.6) To access this file, from the terminal, go  to "/root/data/(domain name)/"

orca@omura:~$ cd /opt/discover                                                                             
orca@omura:/opt/discover$ firefox /root/data/www.google.com                            


Read Next : How to set static IP address and networking details in Kali Linux

Read Previous: How to solve database not connected,cache not built or using slow search in Kali Linux metasploit framework

Thursday, April 16, 2015

Linux Bash Shell Tutorial :How to save terminal session typescript or logfile in Linux


   Sometime as a beginner, intermediate or expert system admin, we need to keep a record on what we did to the system whenever we faced with system problems. One way  we can do this is by recording the Linux terminal session.

 We can save terminal session in Linux by using the built in "script" command.  To record any  terminal session type in script command and followed with the file name that you want.

orca@Positive-Space:~$ script log.01012015                                               

  I make it a habit to include the date in all my logs file name for future reference. Once you entered the command,  the terminal will save everything that you type in the terminal and will save it in current directory location. In this example, "log.01012015" file will be saved in  "user home" directory.

saving terminal session

To stop the terminal saving,you can use exit command .

orca@Positive-Space:~$ exit                                                                     

stopping terminal saving


The saved file can be viewed using any text file editor.