Tuesday, June 16, 2015

Linux Bash Shell Tutorial :How to use Pipeline and filters . 8 tips and tricks


  In this post, I will share  8 tips that you can use to manage  terminal data using pipeline and filters.

1) less Command

less will allow you to quickly browse any file section by section in the terminal (standard output).


 In above example,when I piped "lshw" command to "less" command, the output is display section by section. you can use space bar or arrow sign to  move to next section of  the file to exit you can press "q"  

2) Sort command 
sort command will sort the output of the first command.


  In above example, "lsusb" command list the usb devices connected to my machine. once I pipe it to sort command ,the usb devices is sorted  accordingly.

3) grep command

grep command will capture certain file pattern and  give the output to the screen


  In above example,i want to search for hardware with the specific word  "Intel" on it.  "lshw" command will list all the hardware on my computer .By pipe it to "grep" command, it will filter the output to only show  the line with Intel specific word in it.

4) wc command

 wc is a short form of "word count" ."wc" command will display the total line, word and byte count of a file .

  
   In above example, I list usb devices on my computer and filter it through "wc" command. The output of this command will give some numbers referring to line,words and bytes . -l will give the total lines , -m will give the total bytes and -w will give the total words in the file.

5) head command

"head" command will print the first few line that we specified in the terminal.

  
   In above example, I want to display first 4 line of "lsusb" result.to do this I pipe "lsusb" command by using head -(dash) n followed with number 4 .

6) tail command

"tail" command will print the last few line that we specified in the terminal.


To display few lines from the bottom of standard output,you can use tail command to do so.  pipe  lsusb command  to tail command followed with -n and followed with number of lines that you want to display. in this example, I display 3 bottom lines from lsusb output.


7) tee command

 "tee" program reads standard input and copies it to both standard output (by allowing the data to continue run down in the pipeline) and to one or more files. This is useful for capturing a pipeline’s contents at an intermediate stage of processing


  In above example, I run "lshw" command to list my computer hardware.
tee command  save lshw output to lshw.txt file And at the same time the output is send to "grep" command to look for intel word pattern, this command work as a T junction in our terminal.


8) uniq command

  "uniq" command is often used in conjunction with sort . "uniq" accepts a
sorted list of data from either standard input or a single filename argument and will remove any duplicate information.


   In above example, I list both files in user binary folder and binary folder.
by pipe it through "uniq" command, it will remove all the duplicate files between these two folder.

 If you want to see the list of duplicates file instead, you can  add -d option to "uniq" command


Read Previous : Linux Bash Shell Tutorial : How to shorten command in Linux Terminal

Friday, June 12, 2015

Linux Bash Shell Tutorial :How to shorten command in Linux terminal

  Using long command  can be a pain especially when it requires us to type every single time and do minor changes in the terminal.We can shorten our Linux command by using a command call "alias" .

This command will let you assign any character combination to a specific command.

orca@Positive-Space:~$ alias chg='cd ..'                                                                   


You can also use numbers to assign the command


Read Next : Linux Bash Shell Tutorial: How to use Pipeline and Filters . 8 Tips and Tricks

Wednesday, June 3, 2015

How to install CentOS in Ubuntu Virtualbox (step by step for dummies)


   In this tutorial I'm going to share on how to install CentOS in Ubuntu Virtualbox. Currently CentOS 7 is the latest version in the market. This tutorial can also be used for future reference  .If you don't have Virtualbox installed on your system, visit my old post on how to do this .

Tutorial rundown 
1)Download latest CentOS
2)Setting CentOS desired parameter in Virtualbox
3)Install CentOS
4)Restart and run CentOS from hard drive.

let's  begin .

1) Download latest CentOS .

1.1) Download latest CentOS from the website.


 1.2) Move the file to the location where you want virtualbox to look for.
(I prefer to keep all my image file in one folder)


2) Setting CentOS desired parameter in Virtualbox

  2.1) Name the new  OS and  choose  "Redhat" as OS version.


  2.2) Set the memory size value for this Operating System.


   2.3) Create a virtual hard drive.


 2.4) Choose "VDI" as the hard drive file type.


2.5) Choose the file size .
 

 2.6) Set virtualbox to use the downloaded image file. Go to "Setting>system"  and look for the CentOS image file.


3) Install CentOS

  3.1) Run CentOS in the Virtualbox


  3.2) Since CentOS Live CD doesn't support guest os version in virtualbox, you will be prompted with warning message once you  are in CentOS environment . Basically, once you use mouse to click in the CentOS space, you wouldn't be able to use the mouse on your host system .To use mouse in the host, you need to press  "CTRL"  button on your right hand side. Please read the message for more info.


 3.3) Begin CentOS installation by clicking "Install to hard drive"


 3.3) Choose the language that you will use during the installation and click  "continue"


 3.4) Before you start with the installation, you can customize  Date,Keyboard, installation destination and network host name details .

  
3.4.1) Date and time setting


3.4.2) Keyboard setting


3.4.3) Installation destination and location


3.4.4) Hostname

Once you done playing around customizing installation details, click
 "Begin Installation"


3.5) During the installation process, you need to create  root password and you can also create a user.


3.5.1) Create root password for CentOS . 


3.5.2) Create a user and it's details


3.6) Once installation finish quit the panel .


4) Restart and run CentOS from hard drive.

4.1) Power off Live Cd Centos .


4.2) Make hard disk as the first boot device for CentOS in the virtualbox.
 Go to  "setting>system "  and drag hard disk as a first or second on the list.


4.3) Run CentOS from virtualbox. You will be using the newly installed CentOS .


Login with your newly created  user


Finally :)


Friday, May 8, 2015

Linux Bash Shell Tutorial : How to use I/O redirection.5 tips and tricks


  Understanding Input Output or I/O redirection works in Linux helps us streamline our job better when working with the terminal. In this tutorial,I will share quick tips and tricks on how to use I/O redirection in our system.

A few terminology that will help you understand this tutorial is as below:


Standard Input -what is being type in terminal from keyboard.

Standard output -text that display in terminal on command execution
Standard  error – text that display in terminal when a command runs and exit with an error

Content List

1)Redirecting standard output to a file.
2)Redirecting a file to standard input.
3) Redirecting standard error to a file.
4)Redirecting Standard output and error to one file
5) Disposing unwanted output -/dev/null (bit bucket)


1)Redirecting standard output to a file.


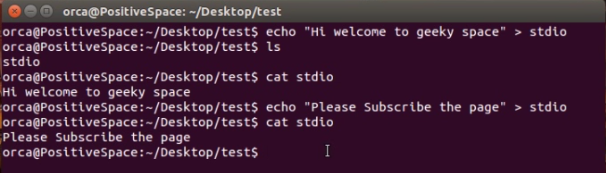
Use “>” operator sign to redirect and save output file in current directory .


To append/update existing file use “>>”


2)Redirecting a file to standard input.

Use  “<” operator to redirect an input to the terminal


In above example, I write new content to file stdin and  redirect stdin file to the terminal  using "<" sign operator.

3) Redirecting standard error to a file.

Use “2>” operator sign to redirect standard error to a new file in current directory.


To append/update existing file use “2>>”


4)Redirecting Standard output and error to one file

Use “&>” operator sign to redirect standard output and standard error to a  new file in current directory .


To append/update existing file use “&>>”


file stdouterr
5) Disposing unwanted output -/dev/null (bit bucket)

Use “2> /dev/null” operator sign to redirect unwanted  output to bit bucket. Data  that are redirect to bit bucket will be deleted without a trace. As such some people also call bit bucket as a black hole.


*NOTE:If you execute the same command using  ">" ,"<" ,"2>" ,"&>"  to same file name but with different content, the file will be overwritten with new file content .